
- Home
- About us
- Products
- for Siemens
- Agricultural Terminal
- for A-B-B
- Advantech
- Allen Bradley
- AMTouch
- B&R Power Panel
- BECKHOFF HMI operator Repair
- Beijer HMI
- Bosch Rexroth
- Danielson Touch Screen Replacement
- Delem
- Delta
- DMC
- EATON Micro Panel
- ELO Touch Screen Panel
- ESA HMI
- Exor UniOP
- EZ Automation
- Fagor
- Fuji Hakko
- GE Fanuc
- GUNZE Touch Panel
- IDEC
- Koyo
- KUKA SmartPAD
- Lenze
- Microtouch 3M Versatouch touch screen
- Mitsubishi
- Omron
- Panasonic
- Parker
- Proface
- Red Lion
- Robotic Controller
- Schneider
- Sigmatek HMI
- Ventilator Parts
- Weinview
- Other Terminal Brand
- HMI Touch Screen Panel
- Touch Panel Screen Suppliers
- Touch Screen Panel supplier
- Auxiliary Accessories
- LCD Display
- test11
- Faqs
- News
- Certificate
- Contact us
Troubleshooting Common Panasonic Teach Pendant Issues
Troubleshooting Common Panasonic Teach Pendant Issues
As a leading provider of industrial automation solutions with over 20 years of experience, Vicpas specializes in HMI operator panel parts, including high-quality replacements for Panasonic Teach Pendants. Our expertise in touch screens, membrane keypads, and robotic interfaces ensures that we deliver reliable, tested products to keep your operations running smoothly. In this comprehensive guide, we'll dive into troubleshooting common issues with the Panasonic Teach Pendant, drawing from our extensive knowledge and customer support cases at Vicpas. Whether you're dealing with connection errors, screen malfunctions, or operational glitches, we've got you covered. For premium replacement parts or custom solutions, explore our Panasonic Teach Pendant offerings.
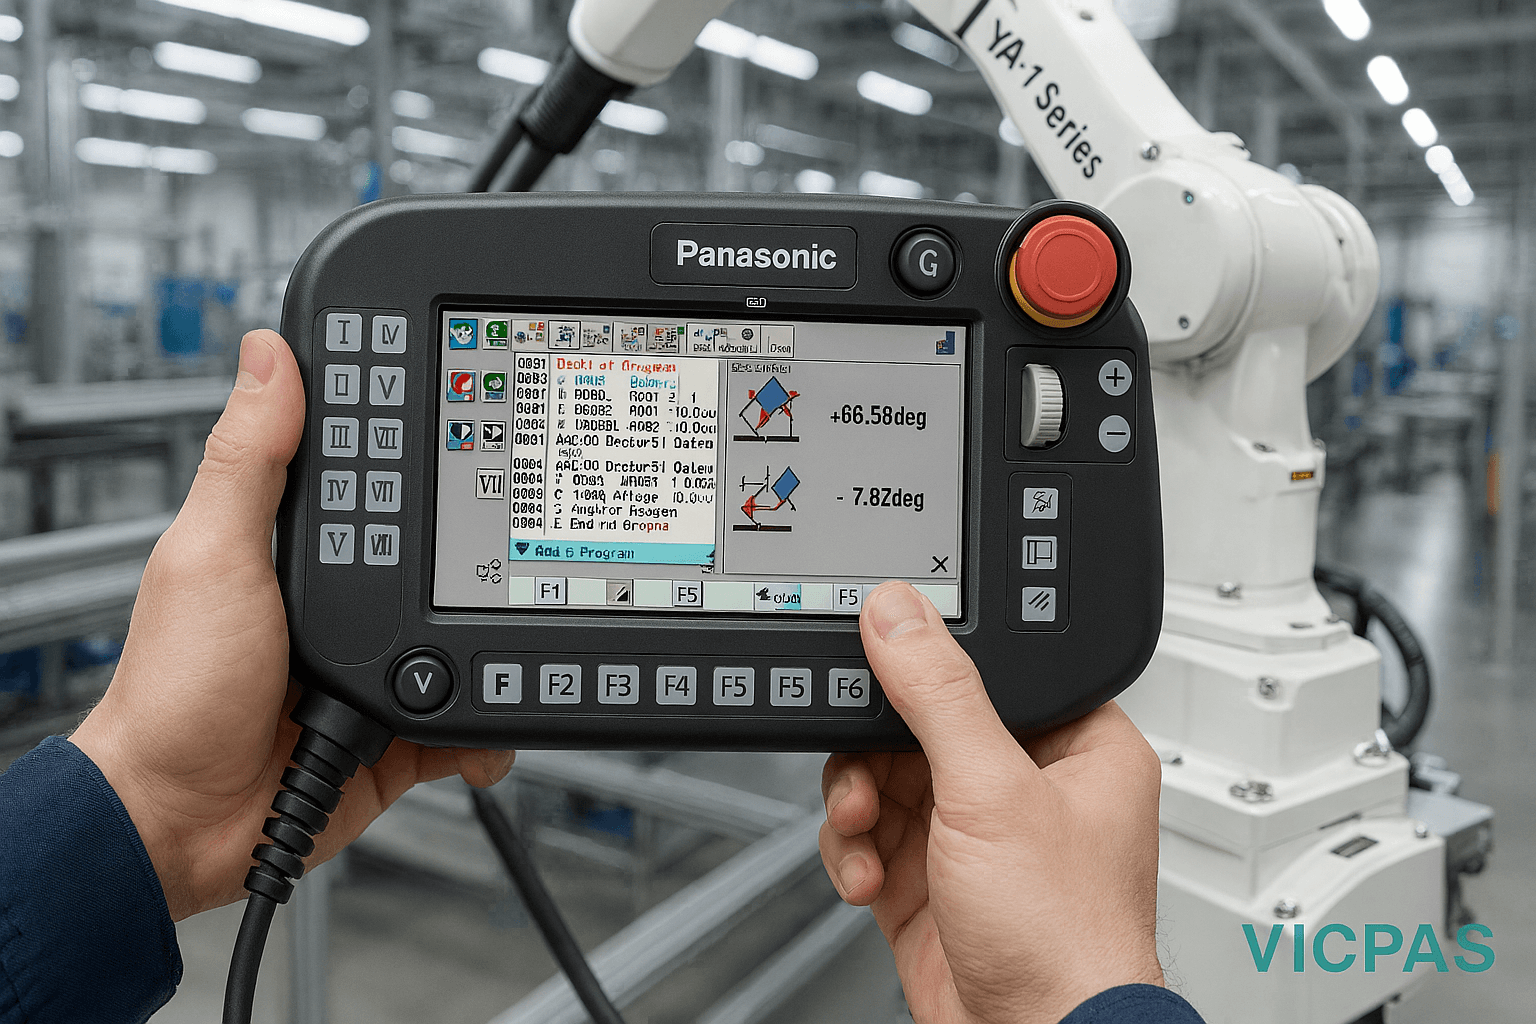
Understanding the Panasonic Teach Pendant
The Panasonic Teach Pendant is an essential human-machine interface (HMI) for programming and controlling Panasonic industrial robots, such as the YA-1 series (including models like YA-1W, YA-1B, YA-1A, YA-1R, and YA-1X). It features a user-friendly TFT color LCD display, jog dial for precise operations, and function keys for efficient teaching and troubleshooting. Common models include the G2 series (e.g., AUR01047, TA1400G2) and G3 series (e.g., AUR01062, TM1400G3), which offer icon-based programming and compatibility with Windows CE™ for enhanced usability.
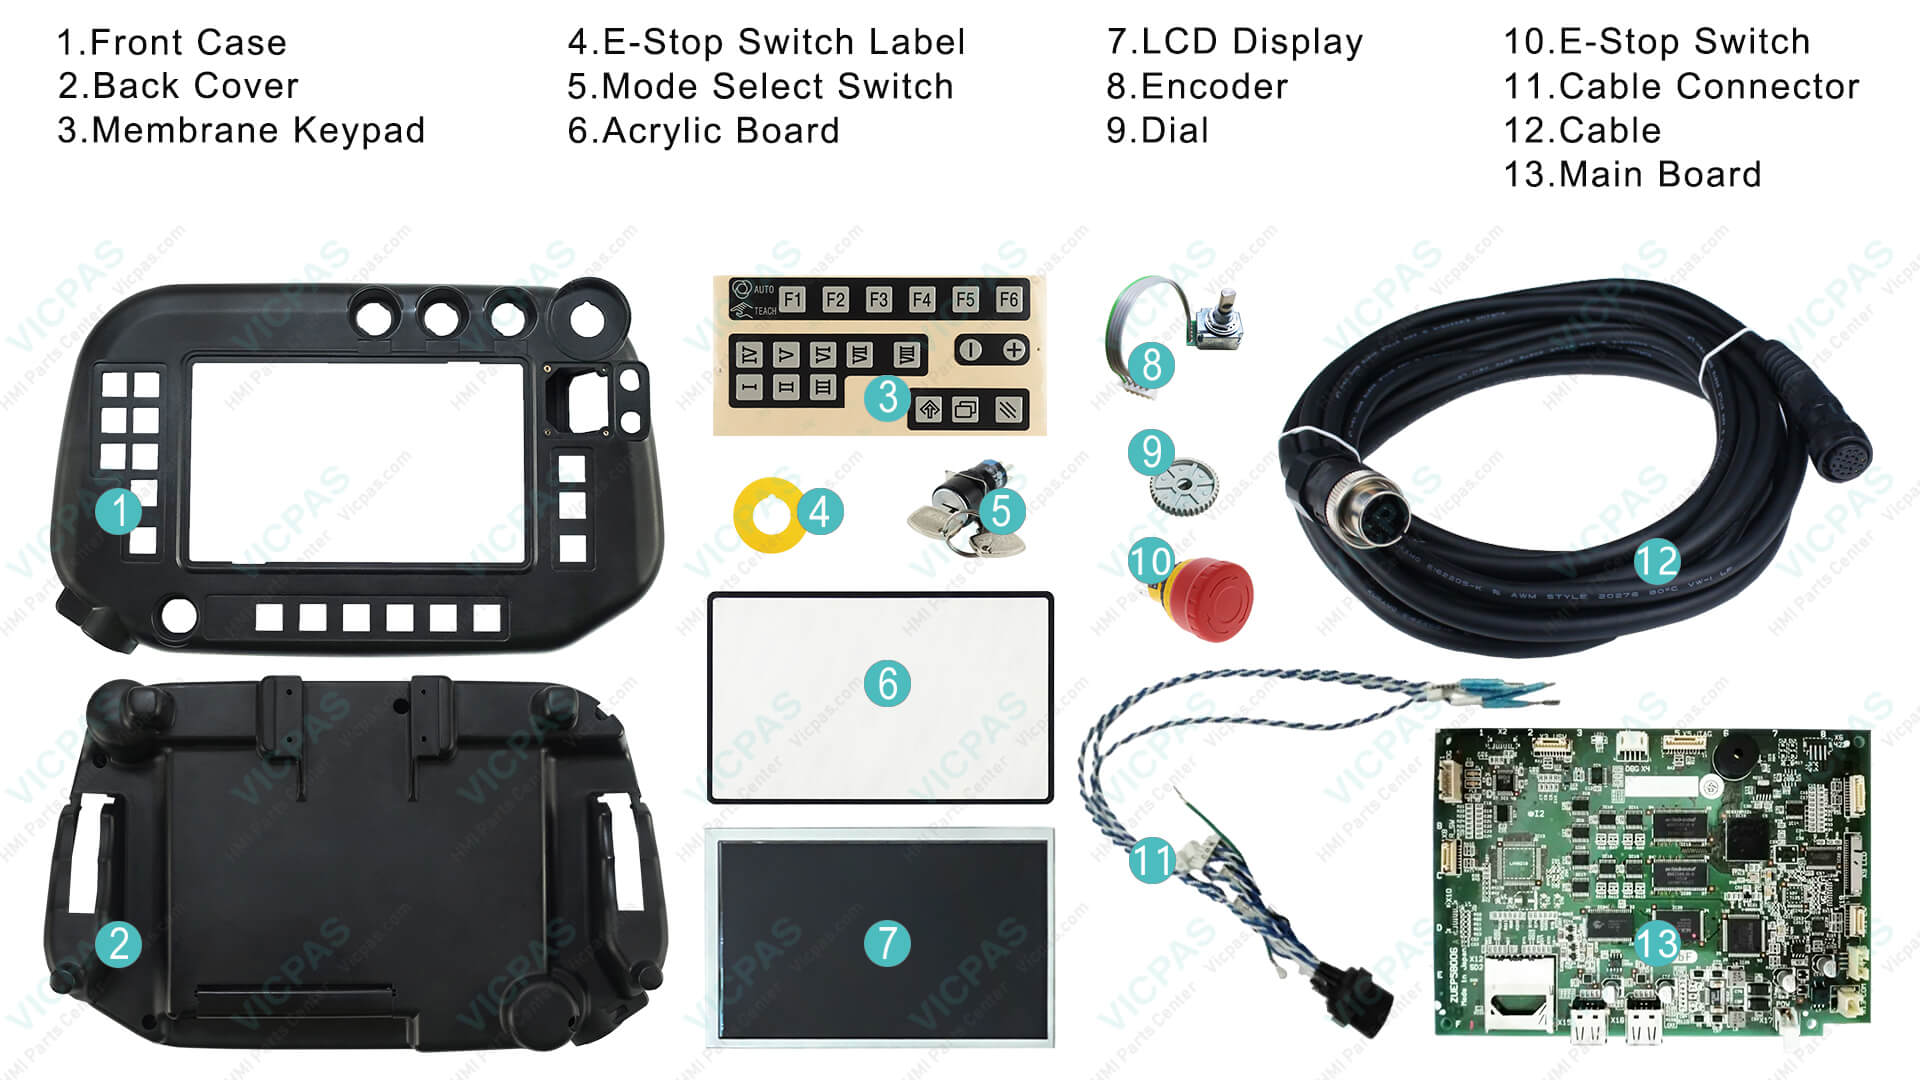
At Vicpas, we stock a wide range of compatible parts, including LCD displays, membrane keypads, and encoders like the TOSOKU RE21PC25CH16F, ensuring seamless replacements for obsolete or damaged units. Our products come with a 12-month warranty and are fully tested to meet factory standards, helping you minimize downtime.
Common Issues and Troubleshooting Steps
Based on our experience at Vicpas, where we've handled thousands of HMI repairs and replacements, here are the most frequent Panasonic Teach Pendant problems and step-by-step solutions. These insights are derived from real-world applications in robotics operations, emphasizing safety, connectivity, and maintenance.
1. Connection Problems (e.g., No Response or Disconnection Errors)
Connection issues often arise from faulty cables, improper wiring, or interlock failures, common in models like YA-1A and YA-1W.
- Symptoms: The teach pendant fails to connect to the robot controller, showing error messages like "Connection Lost" or no power-up.
- Troubleshooting Steps:
- Verify the cable integrity: Inspect for damage or loose connections at both ends. For YA-1 series, ensure the plug aligns with the controller's port.
- Check power supply: Confirm the robot's main power is on and the teach pendant is in the correct operating mode (e.g., Teach or Auto).
- Reset the system: Power cycle the robot and pendant, holding the emergency stop button during restart.
- Test interlocks: In YA-1R models, ensure safety logic (IO signals) is not triggered; clear any faults via the pendant's diagnostic menu.
If the issue persists, it may indicate a worn connector. Vicpas offers direct replacements for Panasonic Teach Pendant cables and interfaces—contact us for a fast quote at Vicpas Support.
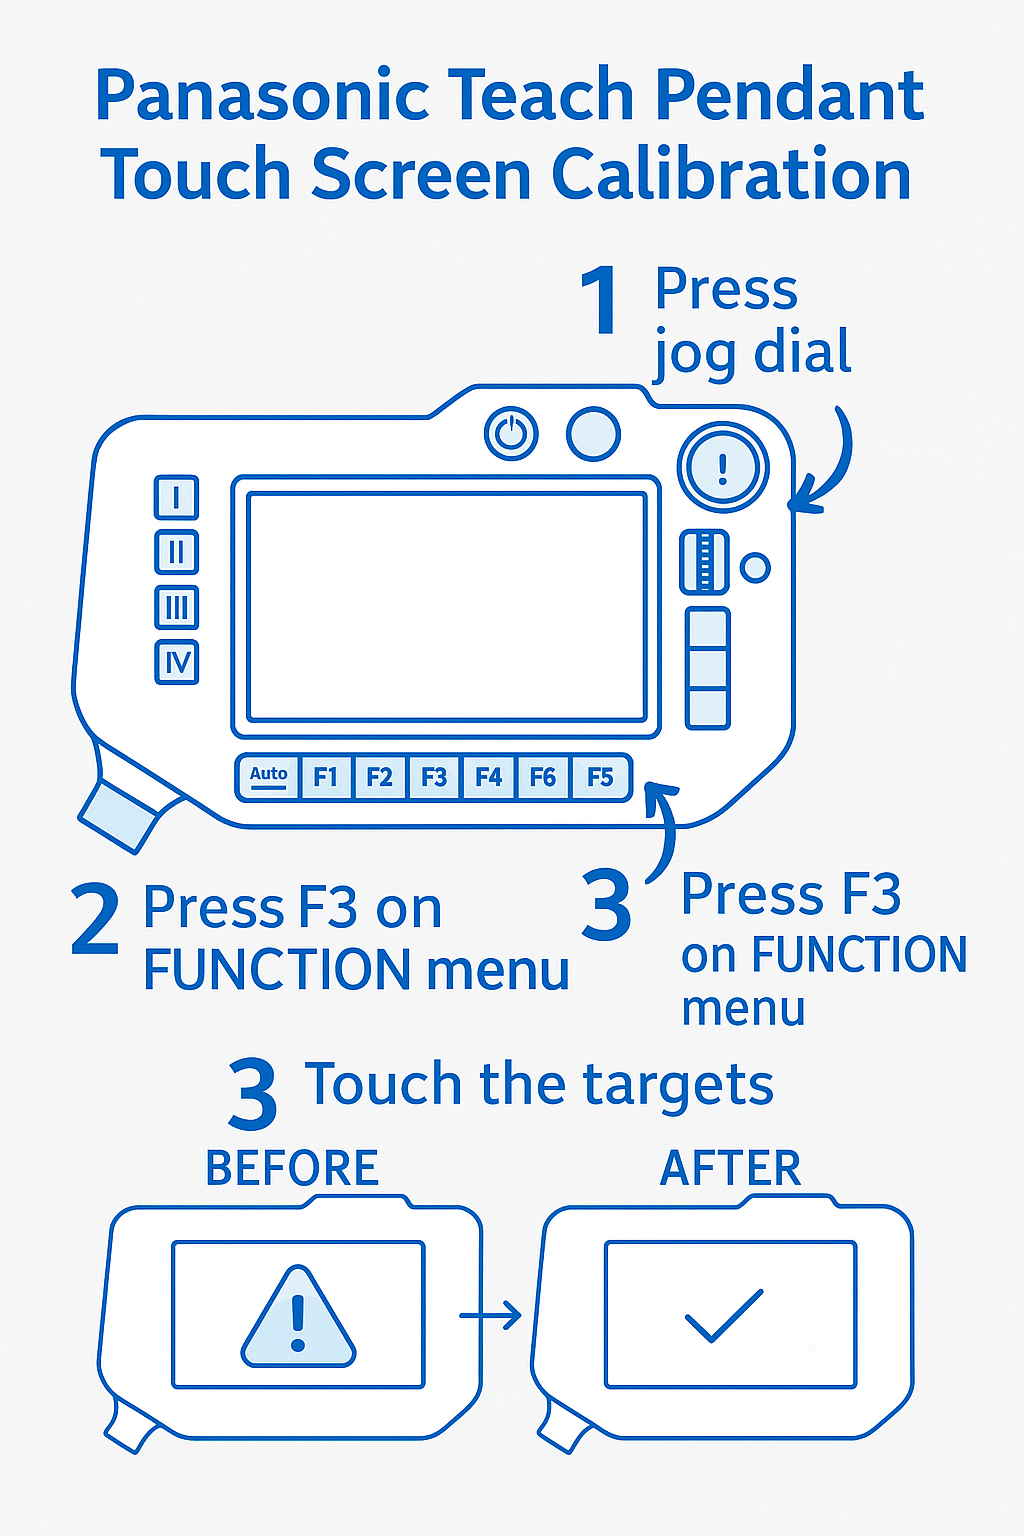
2. Touch Screen Malfunctions (e.g., Unresponsive or Miscalibrated)
Touch screen problems, such as improper calibration or non-functioning areas, are prevalent in G2 and G3 series pendants due to wear or environmental factors.
- Symptoms: Screen doesn't register touches, or inputs are inaccurate; multiple operations trigger unintentionally.
- Troubleshooting Steps:
- Recalibrate the screen: Access the settings menu (usually under "System > Calibration") and follow on-screen prompts using a stylus.
- Clean the display: Use a soft, lint-free cloth with isopropyl alcohol to remove dust or residue—avoid harsh chemicals.
- Update firmware: For Windows CE™-based models like TM1400G3, download and install the latest updates from Panasonic's official resources if available.
- Check for hardware damage: Inspect for cracks or liquid ingress, common in industrial settings.
At Vicpas, our replacement touch screens for Panasonic Teach Pendants are precision-engineered for perfect fit and responsiveness. With no MOQ and global shipping via DHL/UPS, we can have your part delivered urgently.
3. Button or Keypad Failures (e.g., Stuck Keys or No Input)
Membrane keypads and function keys (F1-F5 in G2, up to eight in G3) can degrade over time, leading to operational errors in modes like those in YA-1X.
- Symptoms: Keys don't respond, or inputs are delayed; error codes related to panel differences appear.
- Troubleshooting Steps:
- Perform a keypad test: Enter diagnostic mode (hold power + jog dial) and test each key for feedback.
- Clean contacts: Gently disassemble if qualified, or use compressed air to clear debris.
- Check for overload: Ensure no excessive force is applied; in high-use environments, this accelerates wear.
- Replace the membrane: If testing fails, swap with a compatible unit.
Vicpas provides OEM-quality membrane keypads for Panasonic Teach Pendants, including models like AUR01053 and AUR01060, backed by our 1-year warranty and expert customization services.
4. Safety and Fault Errors (e.g., Emergency Stop or Interlock Issues)
Safety logic faults, as seen in YA-1R and general Panasonic robot instructions, can halt operations.
- Symptoms: Pendant displays safety alerts, preventing start/stop; IO signals indicate locks.
- Troubleshooting Steps:
- Release emergency stop: Twist and pull the button, then reset via the menu.
- Inspect wiring: For YA-1B models, verify start/stop wiring and universal panel connections.
- Clear error logs: Navigate to "Faults > Clear" and restart in safe mode.
- Consult manual diagnostics: Run built-in tests for interlocks.
Our team at Vicpas, with decades of experience in industrial safety components, recommends regular maintenance to avoid these issues.
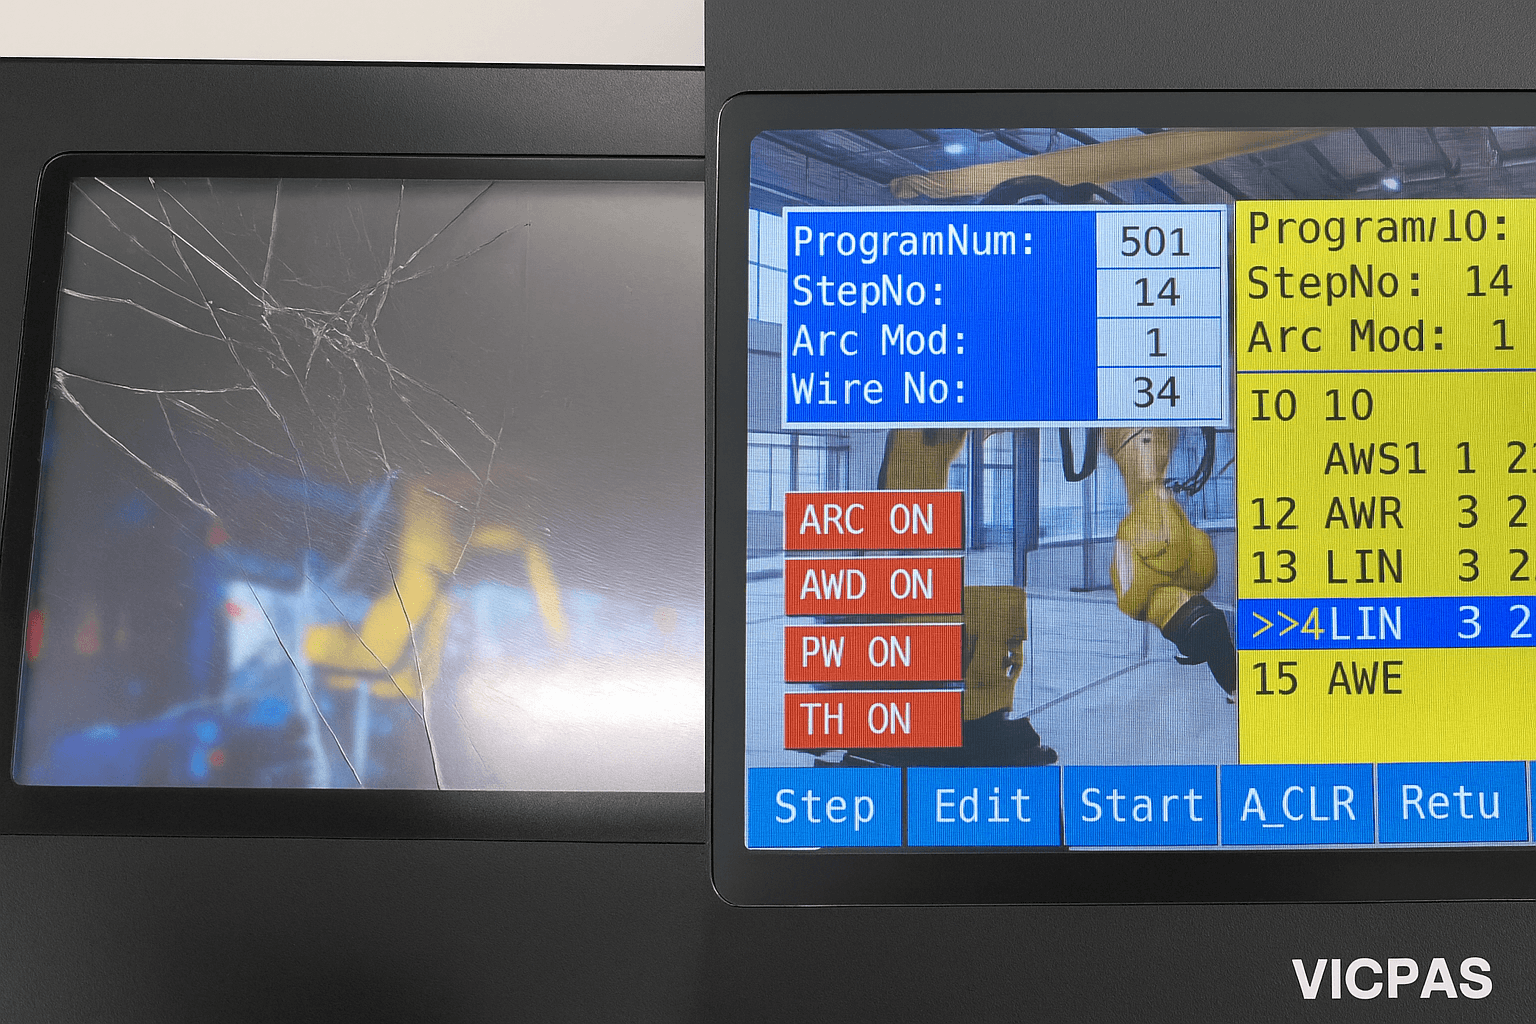
5. Display or Backlight Problems (e.g., Dim Screen or No Image)
LCD failures affect visibility, especially in 7-inch TFT displays.
- Symptoms: Screen is blank, flickering, or dim.
- Troubleshooting Steps:
- Adjust brightness: Use function keys to increase backlight.
- Check power: Ensure battery (if applicable) or cable provides stable voltage.
- Replace LCD: If hardware fault, professional replacement is needed.
Vicpas stocks 7-inch TFT LCD displays for Panasonic Teach Pendants, ensuring color accuracy and durability.
Preventive Maintenance Tips for Panasonic Teach Pendants
To extend the life of your Panasonic Teach Pendant:
- Store in a dust-free environment and use protective covers.
- Schedule annual inspections, focusing on cables and screens.
- Train operators on proper handling to avoid common faults.
At Vicpas, our authoritative position in HMI parts comes from partnerships with top manufacturers and a global supply chain, ensuring trustworthiness in every product.
Conclusion: Partner with Vicpas for Reliable Solutions
Troubleshooting Panasonic Teach Pendant issues can be straightforward with the right knowledge and parts. If DIY fixes aren't enough, turn to Vicpas for expert repairs, replacements, and customizations. With fast worldwide shipping, flexible payments (PayPal, credit tickets, etc.), and a commitment to quality, we're your go-to source for Panasonic Teach Pendant needs. Visit our company page at Vicpas About Us to learn more about our 20+ years of expertise, or browse our products directly at Panasonic Teach Pendant. Contact us today for personalized support!
References
- Panasonic YA-1W Robot — Operating Instructions
- Panasonic YA-1B Robot — Operating Instructions
- Panasonic YA-1A Robot — Operating Instructions
- Panasonic YA-1 Series — Operating Instructions
- Panasonic YA-1R Robot — Operating Instructions
- Panasonic YA-1X Robot — Operating Instructions
- Panasonic Robot — Operating Instructions
- Panasonic Robot — Operating Manual