
- Home
- About us
- Products
- for Siemens
- Parker
- ABB
- Allen Bradley
- AMTouch
- Beijer HMI
- Bosch Rexroth
- B&R Power Panel
- DMC
- Delem
- Delta
- Fagor
- ESA HMI
- ELO Touch Screen Panel
- EATON Micro Panel
- Exor UniOP
- GE Fanuc
- John Deere
- Koyo
- KUKA SmartPAD
- Lenze
- Mitsubishi
- Omron
- Panasonic
- Proface
- Red Lion
- Robotic Controller
- Schneider
- Trimble
- Ventilator Parts
- Sigmatek HMI
- Microtouch 3M Versatouch touch screen
- GUNZE Touch Panel
- Danielson Touch Screen Replacement
- Fuji Hakko
- EZ Automation
- BECKHOFF HMI operator Repair
- Other Terminal Brand
- HMI Touch Screen Panel
- Touch Screen Panel supplier
- LCD Display
- Touch Panel Screen Suppliers
- Auxiliary Accessories
- IDEC
- Advantech
- Faqs
- News
- Certificate
- Contact us
6AV7251-3BA01-0DA0 Siemens IPC477E PRO Touch Glass Repair


- group name
- SIMATIC IPC 477
- Min Order
- 1 piece
- brand name
- VICPAS
- model
- 6AV7251-3BA01-0DA0
- Nearest port for product export
- Guangzhou, Hongknog, Shenzhen, Taiwan
- Delivery clauses under the trade mode
- FOB, CFR, CIF, EXW, FAS, CIP, FCA, CPT, DEQ, DDP, DDU, Express Delivery, DAF, DES
- Acceptable payment methods
- T/T, L/C, D/P D/A, MoneyGram, Credit Card, PayPal, Westem Union, Cash, Escrow
- update time
- Mon, 20 May 2024 22:54:02 GMT
Paramtents
Touch screen panel type Capacitive touch screen
Size 15 inch
Warranty 365 Days
Shipping 2-4 workdays
Brand Siemens
Supply Parts 6AV7 251-3BA01-0DA0 Touch Membrane
Part Number 6AV72513BA010DA0
Product Line SIMATIC IPC477E PRO
Packging & Delivery
-
Min Order1 piece
Briefing
Detailed
SIMATIC IPC477E PRO 6AV7251-3BA01-0DA0 Touch Digitizer Glass Replacement Repair

VICPAS presents a comprehensive assortment of top-grade accessories tailored specifically for the SIMATIC IPC477E PRO 6AV7251-3BA01-0DA0 Touch Panel HMI, addressing the nuanced requirements of industrial automation clients. From resilient 6AV7 251-3BA01-0DA0 Touch Membranes to responsive membrane keypads and safeguarding overlays, VICPAS furnishes components meticulously engineered to seamlessly integrate with the SIMATIC IPC477E PRO HMI, thus ensuring optimal functionality and prolonged usability.
Distinguished by precision engineering and premium-grade materials, VICPAS accessories for the SIMATIC IPC477E PRO HMI epitomize durability and reliability, even in the most demanding industrial settings. Whether it's refreshing an aging 6AV72513BA010DA0 MMI Touch Screen, enhancing tactile responsiveness with a new keypad, or fortifying against wear and tear with a protective overlay, VICPAS empowers clients with solutions that augment the performance and longevity of their HMI devices.
With VICPAS accessories at their disposal, clients can confidently fine-tune the capabilities of their SIMATIC IPC477E PRO HMI, extending its operational lifespan and mitigating downtime, thereby amplifying productivity and efficiency across industrial endeavors. VICPAS stands as a trusted ally, delivering accessories that uphold the highest benchmarks of quality, dependability, and performance, ensuring seamless functionality and sustained operational excellence for SIMATIC IPC477E PRO HMI units over the long haul.
Specifications:
The table below describes the parameters of the Siemens IPC477E PRO 6AV7251-3BA01-0DA0 Touch Screen.
| Product Line: | SIMATIC IPC477E PRO |
| Installation Type: | For horizontal and vertical mounting |
| Response Time: | ≤5ms |
| Brightness: | 350cd/m² |
| Warranty: | 1-Year Warranty |
| Touch Size: | 15.6 inch |
| Contrast Ratio: | 1000:1 |
| Operation Temperature: | -10℃~+60℃ |
| Storage Temperature: | -20℃~+70℃ |
| Protection Grade: | IP65 |
Related Siemens IPC477E PRO HMI Part No. :
| SIEMENS IPC477E PRO | Description | Inventory status |
| 6AV7251-1DA55-0DA0 | SIMATIC IPC477E PRO Series Touch Screen Monitor | In Stock |
| 6AV7251-1NA55-0DA0 | SIEMENS IPC477E PRO Series MMI Touch Screen Repair | Available Now |
| 6AV7251-3BA01-0DA0 | SIMATIC IPC477E PRO Series Touch Digitizer Replacement | In Stock |
| 6AV7251-3BA04-0FA0 | SIMATIC IPC477E PRO Series Touch Screen Replacement | In Stock |
| 6AV7251-3CA04-0FA0 | SIMATIC IPC477E PRO Series Touch Panel Replacement | Available Now |
| 6AV7251-3CA34-0FA0 | SIEMENS IPC477E PRO Series Touch Digitizer Glass Repair | In Stock |
| 6AV7251-3CB00-0FA0 | SIMATIC IPC477E PRO Series Touch Screen Glass Repair | Available Now |
| 6AV7251-3CB05-0FA0 | SIMATIC IPC477E PRO Series Touch Screen Panel Replacement | In Stock |
| 6AV7251-3DA05-0DA0 | SIEMENS IPC477E PRO Series Touch Membrane Repair Replacement | In Stock |
| 6AV7251-5BB05-0DA0 | SIMATIC IPC477E PRO Series Touch Glass Replacement | In Stock |
| 6AV7251-5BC30-0GA0 | SIEMENS IPC477E PRO Series Touch Digitizer Glass Repair | Available Now |
| 6AV7251-5CC04-0FA0 | SIMATIC IPC477E PRO Series HMI Panel Glass Repair | Available Now |
| 6AV7251-5DB35-0DA0 | SIMATIC IPC477E PRO Series Touch Screen Monitor | In Stock |
| 6AV7255-6HA00-0SE0 | SIEMENS IPC477E PRO Series MMI Touch Screen Repair | Available Now |
| SIMATIC IPC477E PRO | Description | Inventory status |
SIMATIC IPC477E PRO Series Manuals PDF Download:
FAQ:
Question: How to connect the PE conductor?
Answer:
Requirement
• The device is installed.
• 1 protective conductor, minimum cross section 2.5 mm2 (= AWG14)
• 1 T20 screwdriver
• 1 cable lug for M4
Procedure
1. Clamp the cable lug onto the protective conductor.
2. Connect the cable lug to the screw at the designated protective conductor connection.
Tighten the M4 screw with a torque of max. 1.5 Nm.
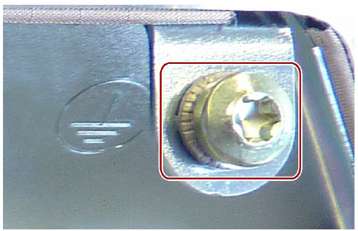
3. Connect the protective conductor to the protective conductor connection of the control cabinet from which the PRO device is supplied.
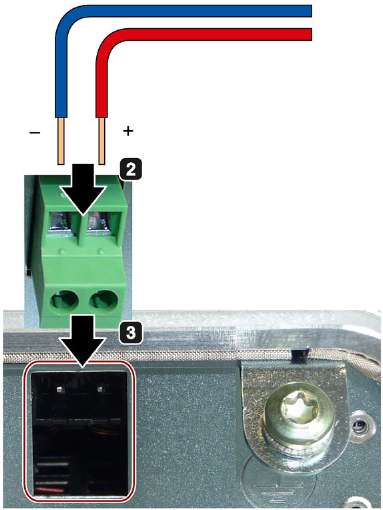
Question: How to connect the 24 VDC power supply?
Answer:
Requirements
• The device is installed.
• The protective conductor is connected.
• The connection terminal is wired.
• The corresponding 24 V DC power supply is switched off.
• A two-core cable with a cable cross-section of ≥ 0.5 mm2 for the 24 V DC connection.
• A slotted screwdriver with approx. 3 mm blade.
Procedure
1. Switch off the 24 V DC power supply.
2. Connect the wires of the power supply.
3. Plug the connecting terminal into the connection socket at the indicated position.
The connecting terminal must snap into the connection socket.
4. Secure the power supply cable to the strain relief with a cable tie.

Common misspellings:
6AV7251-3BA01-0A0
6AV7251-BA01-0DA0
6AV7251-3BA0-01DA0
6AV7251-3BA01-0DAo
6AV725l-3BA01-0DA0
6AV7251-3BAA01-0DA0
6AV77251-3BA01-0DA0