- Home
- About us
- Products
- for Siemens
- Agricultural Terminal
- for A-B-B
- Advantech
- Allen Bradley
- AMTouch
- B&R Power Panel
- BECKHOFF HMI operator Repair
- Beijer HMI
- Bosch Rexroth
- Danielson Touch Screen Replacement
- Delem
- Delta
- DMC
- EATON Micro Panel
- ELO Touch Screen Panel
- ESA HMI
- Exor UniOP
- EZ Automation
- Fagor
- Fuji Hakko
- GE Fanuc
- GUNZE Touch Panel
- IDEC
- John Deere
- Koyo
- KUKA SmartPAD
- Lenze
- Microtouch 3M Versatouch touch screen
- Mitsubishi
- Omron
- Panasonic
- Parker
- Proface
- Red Lion
- Robotic Controller
- Schneider
- Sigmatek HMI
- Trimble
- Ventilator Parts
- Weinview
- Other Terminal Brand
- HMI Touch Screen Panel
- Touch Panel Screen Suppliers
- Touch Screen Panel supplier
- Auxiliary Accessories
- LCD Display
- Faqs
- News
- Certificate
- Contact us
Proface 2980078-02 GP2500-SC41-24V Film Touchscreen


- group name
- GP2000 GP2000H Series
- Min Order
- 1 piece
- brand name
- VICPAS
- model
- 2980078-02 GP2500-SC41-24V PFXGP2500SD
- Nearest port for product export
- Guangzhou, Hongknog, Shenzhen, Taiwan
- Delivery clauses under the trade mode
- FOB, CFR, CIF, EXW, FAS, CIP, FCA, CPT, DEQ, DDP, DDU, Express Delivery, DAF, DES
- Acceptable payment methods
- T/T, L/C, D/P D/A, MoneyGram, Credit Card, PayPal, Westem Union, Cash, Escrow
- update time
- Fri, 20 Feb 2026 17:05:48 GMT
Paramtents
Brand Proface
Size 10.4 inch
Warranty 365 Days
Product Line Proface GP2000 Series
Supply GP-2500S Protective Film Touch Screen
Part Number 2980078-02 GP2500-SC41-24V PFXGP2500SD
Shipping 2-4 workdays
Packging & Delivery
-
Min Order1 piece
Briefing
Detailed
Proface GP-2500S 2980078-02 GP2500-SC41-24V PFXGP2500SD Touch Panel Front Overlay Replacement
Order each part separately is available

VICPAS supply Pro-face GP2000 GP-2500S 2980078-02 GP2500-SC41-24V PFXGP2500SD Protective Film and Touch Screen Panel with 365 days warranty and support Urgent Worldwide Shipping. For the safe and correct use of this 2980078-02 GP2500-SC41-24V PFXGP2500SD HMI Panel Glass Protective Film unit, be sure to follow the guidelines stated below:
Due to the possibility of an electrical shock, be sure the Power Cord is not plugged in to a power supply when first connecting the Power Cord's power terminals to the 2980078-02 GP2500-SC41-24V PFXGP2500SD Front Overlay Touch Screen GP-2500S.
Because the GP-2500S contains high voltage parts, an electrical shock can occur if the user tries to disassemble the unit. The GP-2500S should be disassembled only by an authorized serviceman.
Do not use 2980078-02 GP2500-SC41-24V PFXGP2500SD unit's touch panel keys to perform any life-threatening or accident-prevention operations (i.e. as an Emergency Stop switch, etc.) Be sure to use separate hardware switches for such operations.
Please design your machine's control system so that it will not malfunction due to a communication fault between the GP-2500S and the host controller (PLC).
Do not use power which is outside of the specified voltage range. Doing so may cause a fire or an electric shock.
Do not attempt to modify or alter the GP-2500S 2980078-02 GP2500-SC41-24V PFXGP2500SD Touch Digitizer Glass Protective Film unit. Doing so may cause a fire or an electric shock.
Do not use the GP-2500S in an environment that contains flammable gases, since it may cause explosion.
The GP-2500S uses a lithium battery to back up its internal clock data. If this battery is incorrectly replaced, however, it may explode. To prevent this, be sure to consult with your local GP-2500S distributor before changing this battery.
If this is not done, there is a danger of either personal injury or machinery/material damage.
Specifications:
The table below describes the parameters of the Proface GP-2500S 2980078-02 GP2500-SC41-24V PFXGP2500SD Front Overlay Touch Screen Monitor HMI Machine.
| Ambient Humidity: | 10 to 90%RH (no condensation) |
| Display Resolution: | 640 x 480 pixels |
| Part Number: | 2980070-01 |
| Product Line: | Proface GP-2500S |
| Touch Size: | 10.4" |
| Brand: | Proface |
| Display Type: | STN color LCD |
| Power Supply: | 24 V DC |
| Storage Temperature: | -20 to 60 degrees Celsius |
| Warranty: | 365 Days |
Related Proface GP2000 Series HMI Part No. :
| Pro-face GP2000 | Description | Inventory status |
| GP2500-LG41-24V | Proface GP2000 GP-2500L Touch Screen Protective Film Replacement | In Stock |
| GP2500-SC41-24V | Proface GP2000 GP-2500S Protective Film Touch Panel Repair | Available Now |
| GP2500-TC11 | Proface GP2000 GP-2500T Protective Film Touchscreen Repair | In Stock |
| GP2500-TC41-24V | Proface GP2000 GP-2500T HMI Touch Screen Glass Protective Film | Available Now |
| GP2500-TC41-24V-M | Proface GP2000 GP-2500T Touch Screen Panel Front Overlay Repair | In Stock |
| GP2501-LG41-24V | Pro-face GP2000 GP-2501L Front Overlay Touch Membrane | In Stock |
| GP2501-SC11 | Proface GP2000 GP-2501S Touch Glass Front Overlay Replacement | In Stock |
| GP2501-SC11-M | Proface GP2000 GP-2501S Touch Digitizer Glass Overlay Repair | Available Now |
| GP2501-SC41-24V | Pro-face GP2000 GP-2501S HMI Panel Glass Protective Film | Available Now |
| GP2501-TC11 | Proface GP2000 GP-2501T Front Overlay Touch Screen Monitor | In Stock |
| GP2501-TC41-24V | Proface GP2000 GP-2501T MMI Touch Screen Front Overlay Repair | In Stock |
| Proface GP2000 | Description | Inventory status |
Proface GP2000 Series HMI Manuals PDF Download:
FAQ:
Question: How to install the 2980078-02 GP2500-SC41-24V PFXGP2500SD?
Answer:
1) Insert the GP into the panel cut out, as shown here.

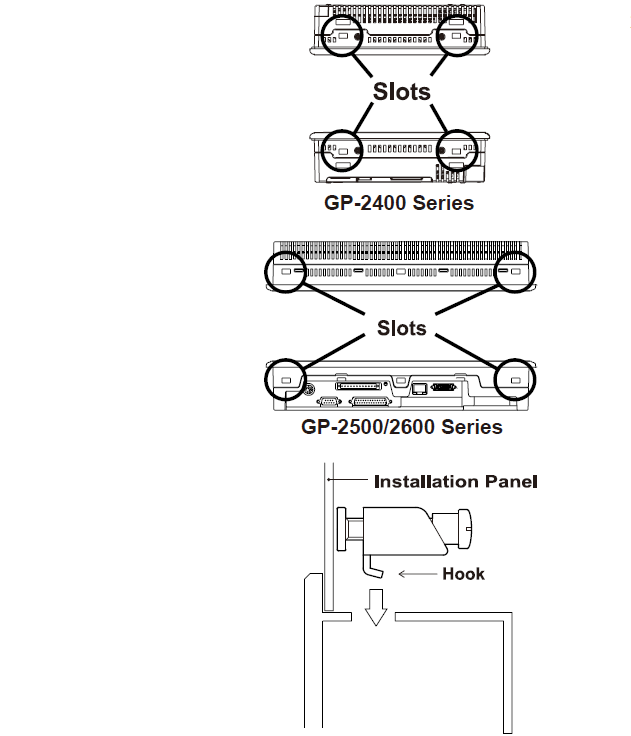
2) Insert the installation fasteners into the GP's insertion slots, at the top and bottom of the unit. (Total: 4 slots)

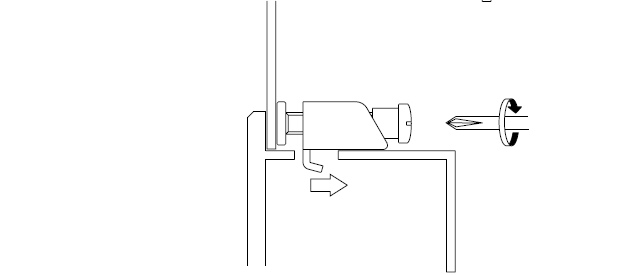
3) Insert each of the fasteners shown below. Be sure to pull the fastener back until it is flush with the rear of the attachment hole.

4) Use a Phillips screw driver to tighten each fastener screw and secure the GP in place.

Common Misspellings:
2980078-02 GP2500-SC41-24V PFXGP250SD2980078-02 GP250-SC41-24V PFXGP2500SD
2980087-02 GP2500-SC41-24V PFXGP2500SD
2980078-02 GP2500-SC41-24V PFXGPZ500SD
2980078-02 GP25000-SC41-24V PFXGP2500SD
