- Home
- About us
- Products
- for Siemens
- Agricultural Terminal
- for A-B-B
- Advantech
- Allen Bradley
- AMTouch
- B&R Power Panel
- BECKHOFF HMI operator Repair
- Beijer HMI
- Bosch Rexroth
- Danielson Touch Screen Replacement
- Delem
- Delta
- DMC
- EATON Micro Panel
- ELO Touch Screen Panel
- ESA HMI
- Exor UniOP
- EZ Automation
- Fagor
- Fuji Hakko
- GE Fanuc
- GUNZE Touch Panel
- IDEC
- John Deere
- Koyo
- KUKA SmartPAD
- Lenze
- Microtouch 3M Versatouch touch screen
- Mitsubishi
- Omron
- Panasonic
- Parker
- Proface
- Red Lion
- Robotic Controller
- Schneider
- Sigmatek HMI
- Trimble
- Ventilator Parts
- Weinview
- Other Terminal Brand
- HMI Touch Screen Panel
- Touch Panel Screen Suppliers
- Touch Screen Panel supplier
- Auxiliary Accessories
- LCD Display
- Faqs
- News
- Certificate
- Contact us
Proface PL5901-T41-24V PL5901-T42-24V PL5901-T4 Touch Screen Monitor Protective Film


- group name
- PL Series
- Min Order
- 1 piece
- brand name
- VICPAS
- model
- PL5901-T41-24V PL5901-T42-24V PL5901-T4
- Nearest port for product export
- Guangzhou, Hongknog, Shenzhen, Taiwan
- Delivery clauses under the trade mode
- FOB, CFR, CIF, EXW, FAS, CIP, FCA, CPT, DEQ, DDP, DDU, Express Delivery, DAF, DES
- Acceptable payment methods
- T/T, L/C, D/P D/A, MoneyGram, Credit Card, PayPal, Westem Union, Cash, Escrow
- update time
- Sat, 21 Feb 2026 09:24:21 GMT
Paramtents
Touch screen tapes Resistance touch screen
Proface touch panel in stock
Brand Proface
Warranty 365 Days
Shipping 2-4 workdays
Supply PL-5900 Front Overlay Touch Screen Monitor
Touch Size 10 inch
Packging & Delivery
-
Min Order1 piece
Briefing
Detailed
Proface PL PL5901-T41-24V PL5901-T42-24V PL5901-T4 Front Overlay Touch Panel Repair
Order each part separately is available

Be aware of the following items when building the PL5901-T41-24V PL5901-T42-24V PL5901-T4 Touch Screen Protective Film PL into an end-use product:
• High-Quality TFT Color LCD Display
• The PL5901-T41-24V PL5901-T42-24V PL5901-T4 Front Overlay Touch Panel unit's rear face is not approved as an enclosure. When building the PL unit into an end-use product, be sure to use an enclosure that satisfies standards as the end-use product's overall enclosure.
• If the PL is mounted so as to cool itself naturally, be sure to install it in a vertical panel. Also, according to the installation requirements, create space around the rear face of the PL unit. The temperature must be checked on the final product in which the PL unit is installed.
• For use on a flat surface of a Type 4X (Indoor Use Only) and/or Type 12 Enclosure.
• Type 4X (Indoor Use Only) and/or 12 Enclosure, when the hatch for Front USB Port is secured by a screw. Type 1 Enclosure, when the hatch for Front USB Port is open.
• The PL5901-T41-24V PL5901-T42-24V PL5901-T4 Touch Digitizer Glass Front Overlay unit must be used indoors only.
• Install and operate the PL5901-T41-24V PL5901-T42-24V PL5901-T4 Touchscreen Glass Protective Film PL with its front panel facing outwards.
Specifications:
The table below describes the parameters of the Proface PL-5900 PL5901-T41-24V PL5901-T42-24V PL5901-T4 Touch Screen Panel Protective Film HMI Machine.
| Brand: | Proface |
| Display Resolution: | 1024 x 1024 pixels |
| Part Number: | PL5901-T41-24V PL5901-T42-24V PL5901-T4 |
| Storage Humidity: | 30%RH to 90%RH (non-condensing) |
| Touch Size: | 10.4" |
| Display Type: | TFT Color LCD |
| Power Supply: | 24 V DC |
| Product Line: | Proface PL |
| Storage Temperature: | -20°C to 60°C |
| Warranty: | 365 Days |
Related Proface PL Series HMI Part No. :
| Pro-face PL | Description | Inventory status |
| PL5901-T4 | Proface PL-5900 Front Overlay Touch Screen Replacement | In Stock |
| PL5901-T41-24V | Proface PL-5900 Touch Panel Protective Film Repair | Available Now |
| PL5901-T42-24V | Proface PL-5900 Touchscreen Protective Film Replacement | In Stock |
| PL5910-T11 | Proface PL-5900 HMI Front Overlay Touch Screen Glass Repair | Available Now |
| PL5910-T11-H2M2 | Proface PL-5900 Touch Screen Panel Protective Film Repair | In Stock |
| PL5910-T41-24V | Pro-face PL-5900 Protective Film Touch Membrane Repair | In Stock |
| PL5910-T41-24V-H2M2 | Proface PL-5900 HMI Touch Glass Front Overlay Repair Replacement | In Stock |
| PL5911-T11 | Proface PL-5900 Touch Digitizer Glass Front Overlay Repair | Available Now |
| PL5911-T11-H2M2 | Pro-face PL-5900 Protective Film HMI Panel Glass Repair | Available Now |
| PL5911-T41-24V | Proface PL-5900 Touch Screen Monitor Front Overlay | In Stock |
| PL5911-T41-24V-H2M2 | Proface PL-5900 Front Overlay MMI Touch Screen Replacement | In Stock |
| Proface PL | Description | Inventory status |
Proface PL Series HMI Manuals PDF Download:
FAQ:
Question: What is Proface PL PL5901-T41-24V PL5901-T42-24V PL5901-T4 Touch Screen Panel Glass Front Overlay HMI parts price?
Answer: Submit a fast quote, send VICPAS an email for best price.
Question: Replacing the 100V Unit's Backlight
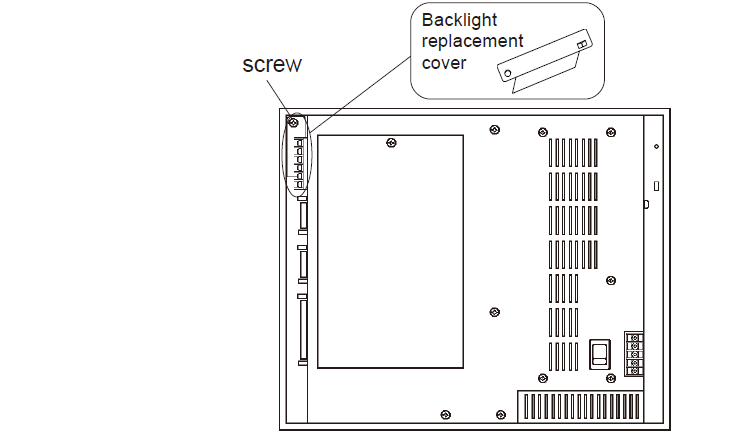
Solution: If the 100V unit's display becomes dark while running the PL, there may be a problem with the backlight. If a problem is found or if the backlight is burnt out, you will need to replace it with a new one.
With the PL-570*T1 and PL-570*S1, you can replace the backlight by yourself. However, if your model is the PL-570*L1 or the PL-570T1-24VC, you will need to ask a Digital service person to replace the backlight. Please contact your nearest Digital Service Center. Also, when using the PL-570*T1 or PL-570*S1, replace the backlight following the instructions below. The part number of the replacement backlight is “GP570-BL00-MS.”

1. Loosen the screw on the backlight recover on the rear panel of the PL, to remove the cover.

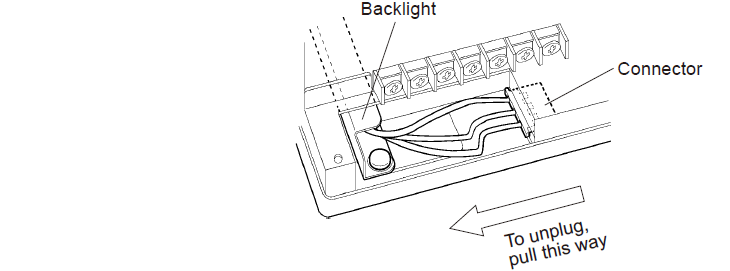
2. Unplug the backlight's connector, and remove the screw which holds the backlight in place. Be careful not to drop this screw inside the PL.
3. Slide the replacement backlight into the PL, secure it in place with the attachment screw, and re-attach the connector.

4. Replace the backlight's cover and tighten its attachment screw. Be careful not to pinch the connector lines between the PL body and this cover.
Common misspellings:
PL5901-T41-24V PL5901-T42-2V PL5901-T4PL5901-T41-4V PL5901-T42-24V PL5901-T4
PL5901-T41-24V PL5901-T42-24V PL5910-T4
PL5901-T41-24V PL5901-T42-24V PL5901-74
PL5901-T41--24V PL5901-T42-24V PL5901-T4
