- Home
- About us
- Products
- for Siemens
- Agricultural Terminal
- for A-B-B
- Advantech
- Allen Bradley
- AMTouch
- B&R Power Panel
- BECKHOFF HMI operator Repair
- Beijer HMI
- Bosch Rexroth
- Danielson Touch Screen Replacement
- Delem
- Delta
- DMC
- EATON Micro Panel
- ELO Touch Screen Panel
- ESA HMI
- Exor UniOP
- EZ Automation
- Fagor
- Fuji Hakko
- GE Fanuc
- GUNZE Touch Panel
- IDEC
- John Deere
- Koyo
- KUKA SmartPAD
- Lenze
- Microtouch 3M Versatouch touch screen
- Mitsubishi
- Omron
- Panasonic
- Parker
- Proface
- Red Lion
- Robotic Controller
- Schneider
- Sigmatek HMI
- Trimble
- Ventilator Parts
- Weinview
- Other Terminal Brand
- HMI Touch Screen Panel
- Touch Panel Screen Suppliers
- Touch Screen Panel supplier
- Auxiliary Accessories
- LCD Display
- Faqs
- News
- Certificate
- Contact us
Keyence VT3-Q5HG Front Overlay HMI Touch Screen Repair


- group name
- Keyence
- Min Order
- 1 piece
- brand name
- VICPAS
- model
- VT3-Q5HG
- Nearest port for product export
- Guangzhou, Hongknog, Shenzhen, Taiwan
- Delivery clauses under the trade mode
- FOB, CFR, CIF, EXW, FAS, CIP, FCA, CPT, DEQ, DDP, DDU, Express Delivery, DAF, DES
- Acceptable payment methods
- T/T, L/C, D/P D/A, MoneyGram, Credit Card, PayPal, Westem Union, Cash, Escrow
- update time
- Sat, 14 Feb 2026 12:45:21 GMT
Paramtents
Brand Keyence
Size 5 inch
Warranty 365 Days
Product Line Keyence VT3
Supply VT3-Q5HG Front Overlay Touch Digitizer Glass
Shipping 2-4 workdays
Packging & Delivery
-
Min Order1 piece
Briefing
Detailed
Keyence VT3 VT3-Q5HG Touch Screen Front Overlay Repair Replacement

Measures for improving noise resistance
• Do not mount the VT3-Q5HG Touch Panel Front Overlay VT3 inside industrial control panels in which high-voltage devices are also located.
• Mount the VT3 as far away as possible from power lines.
• Mount the VT3-Q5HG Protective Film Touchscreen VT3 as far away as possible when it must be mounted next to devices (e.g.solenoids, choppers)that generate strong magnetic and electrical fields.
• Do not include the VT3's I/O leads in the same ducts as power lines and high-voltage lines. Wire the l/O leads in separate ducts. Noise from power lines and high-voltage lines may cause malfunction on the VT3.
• Allow as much space as possible between the VT3 and surrounding structures and other components to improve maintainability, operability and ventilation.
• On VT3-Q5HG HMI Touch Screen Front Overlay VT3 models that are provided with a protective earth terminal and shielded lead, provide a D-type grounding (maximum resistance of 100 Ohms).
Specifications:
The table below describes the parameters of the Keyence VT3 VT3-Q5HG Touch Digitizer Protective Film HMI Parts.
| Cooling Method: | Natural air circulation |
| Backlight: | LED Back Light |
| Brand: | Keyence |
| Product Line: | Keyence VT3 |
| Touch Size: | 5" |
| Display Colors: | 32,768 Colors |
| Display Type: | TFT LCD |
| Operation Temp.: | 0 °C ~ 50 °C |
| Resolution: | 320 x 240 pixels |
| Warranty: | 12-Month Warranty |
Related Keyence VT3 Series Part No. :
| Keyence VT3 HMI | Description | Inventory status |
| VT3-V7R | Keyence VT3 Series Touch Screen Front Overlay Repair | In Stock |
| VT3-V8 | Keyence VT3 Series Protective Film Touch Panel Replacement | Available Now |
| VT3-V10 | Keyence VT3 Series Touch Digitizer Front Overlay Repair | In Stock |
| VT3-V10D | Keyence VT3 Series Protective Film HMI Touch Screen Replacement | In Stock |
| VT3-W4G | Keyence VT3 Series Front Overlay HMI Panel Glass Repair | Available Now |
| VT3-W4GA | Keyence VT3 Series Touch Membrane Protective Film Replacement | In Stock |
| VT3-W4M | Keyence VT3 Series Touchscreen Glass Front Overlay Repair | Available Now |
| VT3-W4MA | Keyence VT3 Series Protective Film Touch Panel Replacement | In Stock |
| VT3-W4T | Keyence VT3 Series Front Overlay HMI Touch Glass Repair | Available Now |
| VT3-W4TA | Keyence VT3 Series Touch Screen Protective Film Replacement | In Stock |
| VT3-X15 | Keyence VT3 Series Front Overlay Touch Digitizer Repair | In Stock |
| VT3-X15D | Keyence VT3 Series Protective Film Touch Membrane Replacement | In Stock |
| Keyence VT3 Series | Description | Inventory status |
Keyence VT3 Series HMI Manuals PDF Download:
FAQ:
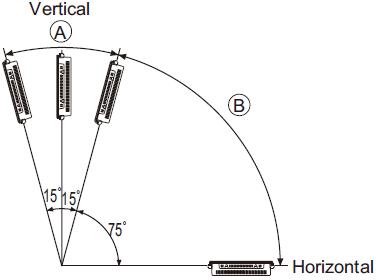
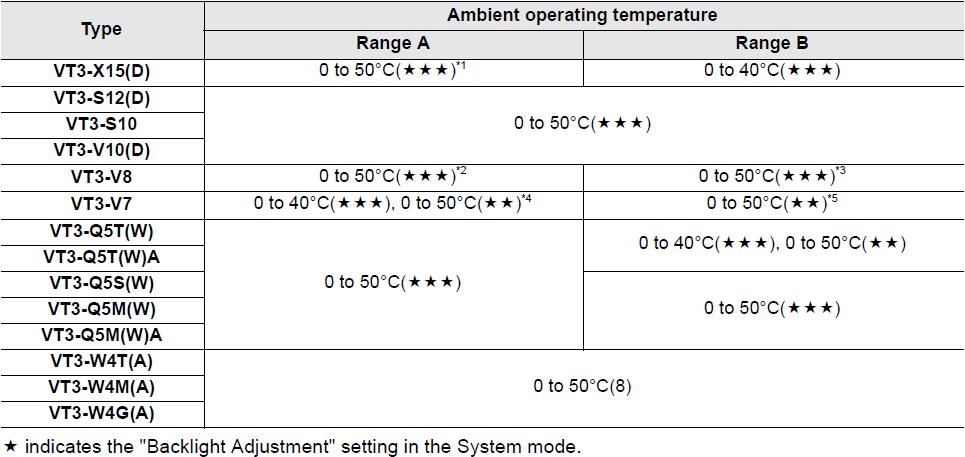
Question: What determines the mounting angle?
Answer:
Mounting angle depends on ambient temperature and Back Light adjustment. Adjust the mounting angle to suit the mounting circumstances.

Question: How to mount the front side of the VT3 Series?
Answer:
1. Cut open a mounting space at the size shown below for fitting the VT3 into.
2. Insert the VT3 into the opening of the industrial control panel for mounting.
3. Fix the VT3 onto the panel using the mounting fixtures. Fixtures are mounted on the sides of the VT3 Series.
4. Tighten the screws on the mounting fixtures.
Common misspellings:
T3-Q5HGVT3-5HG
VT3--Q5HG
V3T-Q5HG
VT3-QH5G
