- Home
- About us
- Products
- for Siemens
- Agricultural Terminal
- for A-B-B
- Advantech
- Allen Bradley
- AMTouch
- B&R Power Panel
- BECKHOFF HMI operator Repair
- Beijer HMI
- Bosch Rexroth
- Danielson Touch Screen Replacement
- Delem
- Delta
- DMC
- EATON Micro Panel
- ELO Touch Screen Panel
- ESA HMI
- Exor UniOP
- EZ Automation
- Fagor
- Fuji Hakko
- GE Fanuc
- GUNZE Touch Panel
- IDEC
- John Deere
- Koyo
- KUKA SmartPAD
- Lenze
- Microtouch 3M Versatouch touch screen
- Mitsubishi
- Omron
- Panasonic
- Parker
- Proface
- Red Lion
- Robotic Controller
- Schneider
- Sigmatek HMI
- Trimble
- Ventilator Parts
- Weinview
- Other Terminal Brand
- HMI Touch Screen Panel
- Touch Panel Screen Suppliers
- Touch Screen Panel supplier
- Auxiliary Accessories
- LCD Display
- Faqs
- News
- Certificate
- Contact us
PS600G-T11-J1 PS600G-T41-J124V PS600G-T41-E124V Film Touch


- group name
- PS3000 Series
- Min Order
- 1 piece
- brand name
- VICPAS
- model
- PS600G-T11-J1 PS600G-T41-J124V PS600G-T41-E124V
- Nearest port for product export
- Guangzhou, Hongknog, Shenzhen, Taiwan
- Delivery clauses under the trade mode
- FOB, CFR, CIF, EXW, FAS, CIP, FCA, CPT, DEQ, DDP, DDU, Express Delivery, DAF, DES
- Acceptable payment methods
- T/T, L/C, D/P D/A, MoneyGram, Credit Card, PayPal, Westem Union, Cash, Escrow
- update time
- Fri, 02 Jan 2026 17:06:57 GMT
Paramtents
Brand Proface
Warranty 365 Days
Product Line Proface PS600G Series
Supply PS600G Protective Film Touch Screen
Part Number PS600G-T11-J1 PS600G-T41-J124V PS600G-T41-E124V
Shipping 2-4 workdays
Packging & Delivery
-
Min Order1 piece
Briefing
Detailed
Proface PS600G PS600G-T11-J1 PS600G-T41-J124V PS600G-T41-E124V Front Overlay Touch Panel Replacement

VICPAS supply Pro-face PS600G Series PS600G-T11-J1 PS600G-T41-J124V PS600G-T41-E124V Protective Film and Touch Screen Panel with 365 days warranty and support Urgent Worldwide Shipping.
• The PS600G-T11-J1 PS600G-T41-J124V PS600G-T41-E124V Touch Membrane Front Overlay PS-G must be used as a built-in component of an end-use product.
• This PS600G-T11-J1 PS600G-T41-J124V PS600G-T41-E124V Touch Digitizer Glass Protective Film unit should be installed in the front face of a metal panel.
• If this PS600G-T11-J1 PS600G-T41-J124V PS600G-T41-E124V Front Overlay Touch Panel unit is installed so as to cool itself naturally, be sure to install it in a vertical panel. Also, be sure that the PS-G is mounted at least 50mm away from any adjacent structures or equipment. If these requirements are not met, the heat generated by the PS-G's internal components may cause the unit to fail to meet UL/c-UL standard requirements.
It is strongly recommended that you use the installation gasket. Place the PS-G on a level surface with the display panel facing downward. Check that the PS-G's installation gasket is seated securely into the gasket's groove, which runs around the perimeter of the panel's frame.
Specifications:
The table below describes the parameters of the Proface PS600G PS600G-T11-J1 PS600G-T41-J124V PS600G-T41-E124V Front Overlay Touch Screen Monitor HMI Machine.
| Ambient Humidity: | 10 to 90%RH (no condensation) |
| Allowable Voltage Drop: | 10 ms or less |
| Product Line: | Proface PS600G |
| Rated Voltage: | DC19.2V to DC28.8V |
| Brand: | Proface |
| Power Supply: | 24 V DC |
| Storage Temperature: | -20 to 60 degrees Celsius |
| Warranty: | 365 Days |
Related Proface PS Series HMI Part No. :
| Pro-face PS HMI | Description | Inventory status |
| PS3711A-T41 | Proface PS3000 Touch Screen Protective Film Replacement | In Stock |
| PS3711A-T41-24V | Proface PS3000 Touch Panel Protective Film Repair | Available Now |
| PS3711A-T42 | Proface PS3000 Touchscreen Protective Film Repair | In Stock |
| PS3711A-T42-24V | Proface PS3000 HMI Touch Screen Glass Protective Film | Available Now |
| PS400G-T41-E124V | Proface PS400G Touch Screen Panel Front Overlay Repair | In Stock |
| PS400G-T41-J124V | Pro-face PS400G Front Overlay Touch Membrane | In Stock |
| PS600G-T11-J1 | Proface PS600G Touch Glass Front Overlay Repair | In Stock |
| PS600G-T41-E124V | Proface PS600G Touch Digitizer Glass Overlay Repair | Available Now |
| PS600G-T41-J124V | Pro-face PS600G HMI Panel Glass Protective Film | Available Now |
| Proface PS Repair | Description | Inventory status |
Proface PS Series HMI Manuals PDF Download:
FAQ:
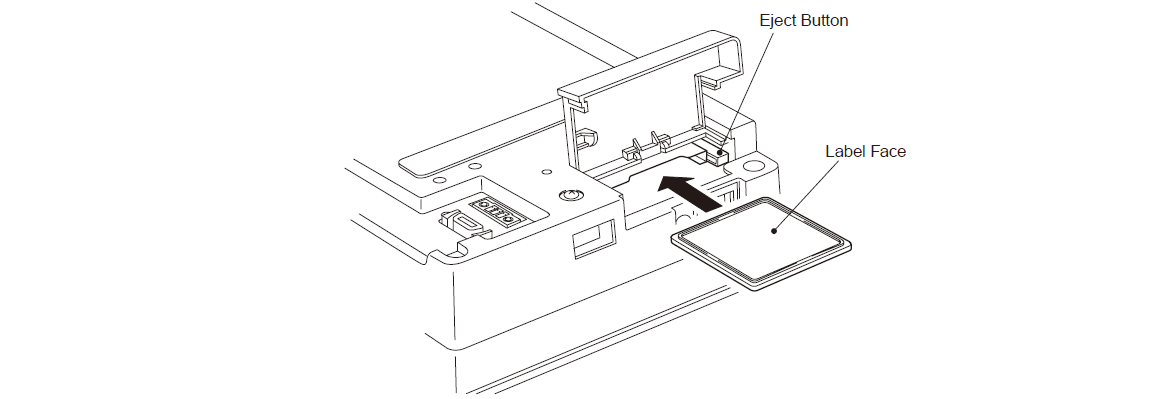
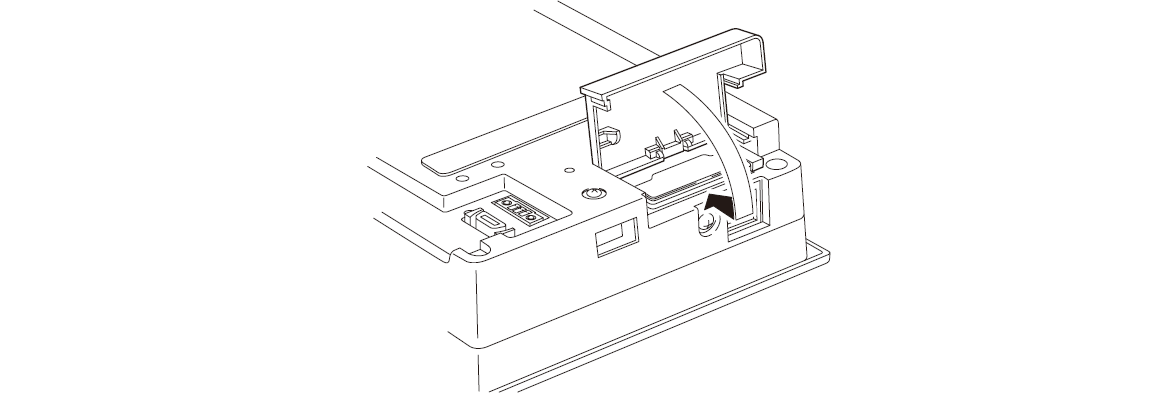
Question: Inserting a CF Card
Solution:
1) Push the cover in the direction indicated, and lift it open.

2) Check the orientation of the CF Card before inserting it into the CF Card slot. Insert the CF Card until the Eject Button pops forward.

3) Close the CF Card cover, then push it in the direction shown, until it clicks shut.

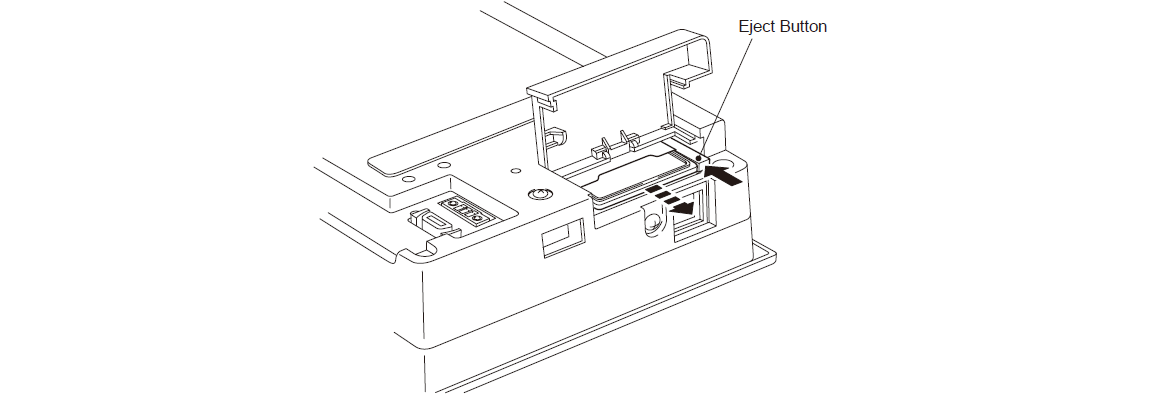
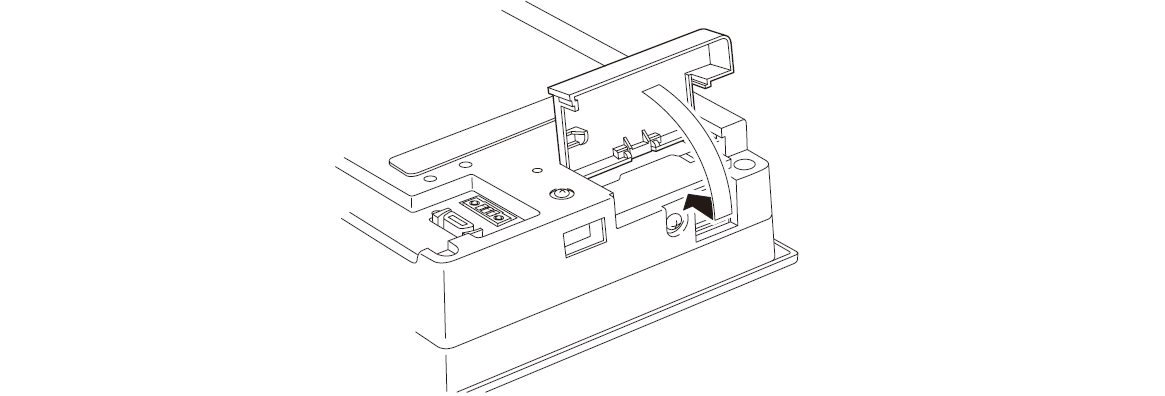
Question: Removing a CF Card
Solution:
1) Push the cover in the direction indicated, and lift it open.

2) Push the Eject Button until the CF Card pops forward.

3) Close the CF Card cover, then push it in the direction shown, until it clicks shut.

Common Misspellings:
PS600G-T11-J1 PS600G-T41-J124V PS600G-41-E124VPS600G-T11-J1 PS600G-T1-J124V PS600G-T41-E124V
PS600G-1T1-J1 PS600G-T41-J124V PS600G-T41-E124V
PS600G-T11-J1 PS6ooG-T41-J124V PS600G-T41-E124V
PS600G-T11-J1 PS600G-T41-J124V PS6000G-T41-E124V
