- Home
- About us
- Products
- for Siemens
- Agricultural Terminal
- for A-B-B
- Advantech
- Allen Bradley
- AMTouch
- B&R Power Panel
- BECKHOFF HMI operator Repair
- Beijer HMI
- Bosch Rexroth
- Danielson Touch Screen Replacement
- Delem
- Delta
- DMC
- EATON Micro Panel
- ELO Touch Screen Panel
- ESA HMI
- Exor UniOP
- EZ Automation
- Fagor
- Fuji Hakko
- GE Fanuc
- GUNZE Touch Panel
- IDEC
- John Deere
- Koyo
- KUKA SmartPAD
- Lenze
- Microtouch 3M Versatouch touch screen
- Mitsubishi
- Omron
- Panasonic
- Parker
- Proface
- Red Lion
- Robotic Controller
- Schneider
- Sigmatek HMI
- Trimble
- Ventilator Parts
- Weinview
- Other Terminal Brand
- HMI Touch Screen Panel
- Touch Panel Screen Suppliers
- Touch Screen Panel supplier
- Auxiliary Accessories
- LCD Display
- Faqs
- News
- Certificate
- Contact us
PanelView 5510 2715P-T10CD-K LCD Display Touch Overlay


- group name
- PanelView 5510
- Min Order
- 1 piece
- brand name
- VICPAS
- model
- 2715P-T10CD-K
- Nearest port for product export
- Guangzhou, Hongknog, Shenzhen, Taiwan
- Delivery clauses under the trade mode
- FOB, CFR, CIF, EXW, FAS, CIP, FCA, CPT, DEQ, DDP, DDU, Express Delivery, DAF, DES
- Acceptable payment methods
- T/T, L/C, D/P D/A, MoneyGram, Credit Card, PayPal, Westem Union, Cash, Escrow
- update time
- Wed, 18 Feb 2026 15:25:58 GMT
Paramtents
Brand Allen Bradley
Product Line Allen-Bradley PanelView 5510 Repair Kit
Parts HMI Touch Screen, Protective Film, LCD Display
Shipping 2-3 workdays
Size 10.4-inch
Warranty 365 Days
Packging & Delivery
-
Min Order1 piece
Briefing
Detailed
Allen-Bradley PanelView 5510 HMI 2715P-T10CD-K Protective Film Touch Digitizer Glass Repair Replacement
Order each part separately is available

The PanelView 5510 2715P-T10CD-K Touch Screen Glass Protective Film LCD Display Screen terminal features pixel graphics capabilities and functionality in color, grayscale, and monochrome displays. These rugged electronic operator interface solutions are available in a variety of sizes and configurations to meet specific application requirements. All use common development software to simplify programming and improve operator productivity.
The PanelView 5510 2715P-T10CD-K Resistive Touch Panel Front Overlay LCD Display terminal communicates with PLC and SLC controllers over EtherNet/IP, DeviceNet, ControlNet, DH-485, DH+, and remote I/O networks, or by using serial communication. Other features supported by the PanelView Standard line include advanced alarm handling, screen security, analog gauges, ATA memory card, universal language support, and online printing for more intuitive operator control.
The PanelView™ 5510 terminals are operator interface devices that monitor and control devices attached to ControlLogix® 5570 or 5580 controllers, and CompactLogix™ 5370, 5380, or 5480 controllers over an EtherNet/IP™ network. Animated graphic and text displays provide a view to operators into the operating state of a machine or process. Operators interact with the control system by using the touch screen or keypad of the terminal.
VICPAS supply Allen Bradley PanelView 5510 HMI 2715P-T10CD-K Resistive Touch Screen, Protective Film and LCD Display with 365 Days warranty and support Urgent Worldwide Shipping.
Specifications:
The table below describes the parameters of the 2715P-T10CD-K PanelView 5510 Parts.
| Part Number: | 2715P-T10CD-K |
| Input Voltage: | 24V DC nom (18…30V DC) |
| Warranty: | 365 Days |
| Backlight: | LED, non-replaceable |
| Brightness: | 300 cd/m2 (Nits) |
| Product Line: | PanelView 5510 |
| Display Size: | 10.4-inch |
| Display Type: | Color TFT LCD |
| Color Depth: | 24-bit color graphics |
| Relative Humidity: | 5…95% without condensation |
Related Allen Bradley PanelView 5510 Terminals Part No. :
| PanelView 5510 | Description | Inventory status |
| 2715P-T10CD | PanelView 5510 2715P-T10CD Front Overlay Touch Glass LCD Display Repair | In Stock |
| 2715P-T10CD-B | 2715P-T10CD-B PanelView 5510 Touch Screen Protective Film LCD Display Repair | In Stock |
| 2715P-T10CD-K | PanelView 5510 2715P-T10CD-K LCD Display Touchscreen Overlay Repair | In Stock |
| 2715P-B10CD | 2715P-B10CD PanelView 5510 Keypad Membrane Touchscreen Repair | Available Now |
| 2715P-B10CD-B | 2715P-B10CD-B PanelView 5510 10.4'' Keypad Screen LCD Display Relacement | Available Now |
| 2715P-B10CD-K | PanelView 5510 2715P-B10CD-K Membrane Switch Touch Glass Repair Repair | In Stock |
| 2715P-T12WD | PanelView 5510 2715P-T12WD 12.1'' Touch Panel Overlay Replacement | In Stock |
| 2715P-T12WD-B | 2715P-T12WD-B PanelView 5510 12.1'' Protective Film Glass Display Repair | Available Now |
| 2715P-T12WD-BSK | PanelView 5510 2715P-T12WD-BSK 12.1'' Glass Panel Front Overlay Repair | Available Now |
| 2715P-T12WD-K | 2715P-T12WD-K PanelView 5510 Touchscreen Protective Film LCD Display | In Stock |
| PanelView 5510 HMI | Description | Inventory status |
PanelView 5510 HMI Manuals PDF Download:
FAQ:
Question: What you need to be aware of when you handle the 2715P-T10CD-K Touch Panel Glass Front Overlay LCD Display terminal:
Answer:
Question: How to replace the battery?
Answer:
1. Disconnect power from the 2715P-T10CD-K Touch Digitizer Monitor Protective Film LCD Display terminal.
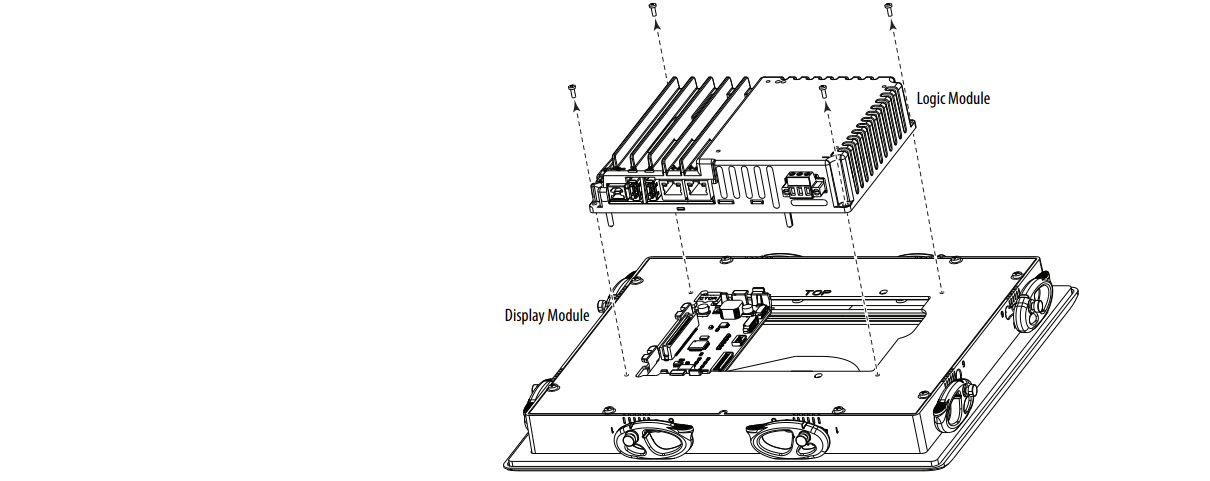
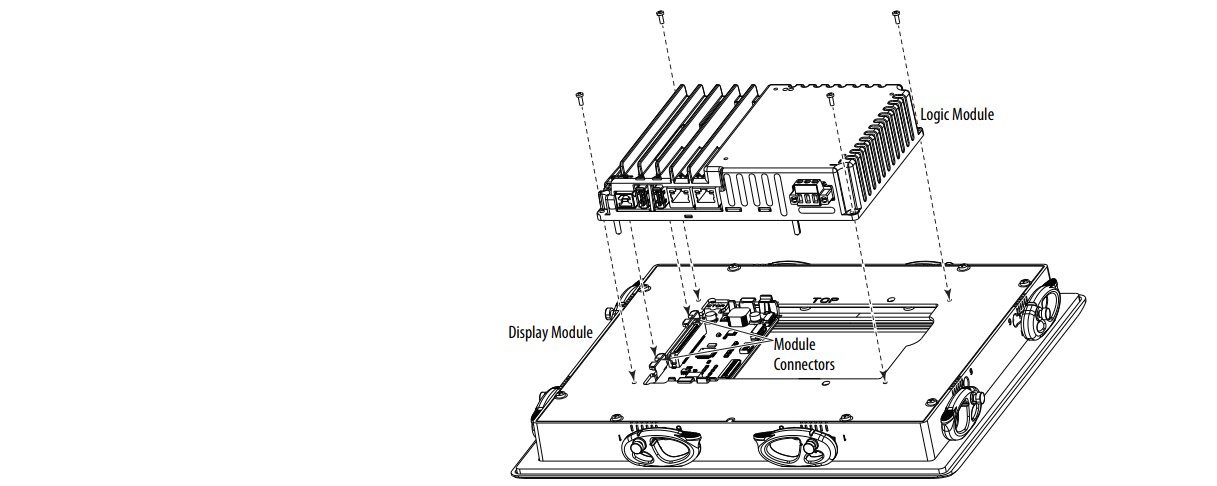
2. Loosen the screws that secure the logic module to the back of the display.

3. Carefully lift the logic module away from the display module and turn over to expose the circuit board.
4. Locate the coin-cell battery on the circuit board.

5. Remove the battery by lifting on the side of the battery.
6. Insert the new battery so the positive (+) polarity faces up.
7. Reattach the logic module by aligning the connector on the bottom of the logic module with the connector on the back of the display module.

8. Push down on the logic module and make sure that it is fully seated.
9. Tighten the screws to a torque of 0.68…0.90 N•m (6…8 lb•in).
Common misspellings:
215P-T10CD-K
2715P-10CD-K
2175P-T10CD-K
2715P-1T0CD-K
27155P-T10CD-K
