- Home
- About us
- Products
- for Siemens
- Agricultural Terminal
- for A-B-B
- Advantech
- Allen Bradley
- AMTouch
- B&R Power Panel
- BECKHOFF HMI operator Repair
- Beijer HMI
- Bosch Rexroth
- Danielson Touch Screen Replacement
- Delem
- Delta
- DMC
- EATON Micro Panel
- ELO Touch Screen Panel
- ESA HMI
- Exor UniOP
- EZ Automation
- Fagor
- Fuji Hakko
- GE Fanuc
- GUNZE Touch Panel
- IDEC
- John Deere
- Koyo
- KUKA SmartPAD
- Lenze
- Microtouch 3M Versatouch touch screen
- Mitsubishi
- Omron
- Panasonic
- Parker
- Proface
- Red Lion
- Robotic Controller
- Schneider
- Sigmatek HMI
- Trimble
- Ventilator Parts
- Weinview
- Other Terminal Brand
- HMI Touch Screen Panel
- Touch Panel Screen Suppliers
- Touch Screen Panel supplier
- Auxiliary Accessories
- LCD Display
- Faqs
- News
- Certificate
- Contact us
EZ7DT-T7C-E EZ7DT-T8C-E EZ7DT-T8C-EH Touch Panel Front Overlay


- group name
- EZTouch HMIs
- Min Order
- 1 piece
- brand name
- VICPAS
- model
- EZ7DT-T7C-E EZ7DT-T8C-E EZ7DT-T8C-EH
- Nearest port for product export
- Guangzhou, Hongknog, Shenzhen, Taiwan
- Delivery clauses under the trade mode
- FOB, CFR, CIF, EXW, FAS, CIP, FCA, CPT, DEQ, DDP, DDU, Express Delivery, DAF, DES
- Acceptable payment methods
- T/T, L/C, D/P D/A, MoneyGram, Credit Card, PayPal, Westem Union, Cash, Escrow
- update time
- Wed, 31 Dec 2025 08:19:03 GMT
Paramtents
Touch screen tapes Resistance touch screen
Size 7 inches and 8 inches
Brand EZAutomation
Warranty 365 Days
Product Line EZAutomation EZTouch HMIs Series
Supply Touch Screen Monitor Protective Film
Shipping 2-4 workdays
Part Number EZ7DT-T7C-E EZ7DT-T8C-E EZ7DT-T8C-EH
Packging & Delivery
-
Min Order1 piece
Briefing
Detailed
EZAutomation EZTouch HMIs EZ7DT-T7C-E EZ7DT-T8C-E EZ7DT-T8C-EH Touch Screen Front Overlay
Order each part separately is available

Programmable control devices such as the EZ7 Series EZ7DT-T7C-E EZ7DT-T8C-E EZ7DT-T8C-EH Protective Film Touch Panel HMI are not fail-safe devices and as such must not be used for stand-alone protection in any application. Unless proper safeguards are used, unwanted start-ups could result in equipment damage or personal injury. The operator must be made aware of this hazard and appropriate precautions must be taken. In addition, consideration must be given to the use of an emergency stop function that is independent of the EZ7 Series EZ7DT-T7C-E EZ7DT-T8C-E EZ7DT-T8C-EH Touch Screen Front Overlay HMIs.
VICPAS supply EZAutomation EZTouch HMIs EZ7DT-T7C-E EZ7DT-T8C-E EZ7DT-T8C-EH Front Overlay and Touch Panel with 365 days warranty and support Urgent Worldwide Shipping. List of Innovative Features
Detachable metal front having Display+Touchscreen
NEMA 4/4X, Class I DIV II
No cut-out, just 3/4” hole for HDMI cable
Upgrade display from any to any size
400 nits, 75K hrs. @ 55°C
Patented HMI on-line edit, No downtime
EZ mini Wifi to program/edit HMI without cable
On-Screen Recipe Edit.
Dual PLC Drivers with automatic tag conversion.
Only HMI that can still talk to AB’s DH+
“C level” scripting and logic expressions.
EZiest Program Software, design time in hrs not days. and the list goes on...
Specifications:
The table below describes the parameters of the EZAutomation EZTouch HMIs EZ7DT-T7C-E EZ7DT-T8C-E EZ7DT-T8C- EHFront Overlay Panel Glass HMI Parts.
| Backlight: | White LED Strips |
| Brand: | EZAutomation |
| Product Line: | EZ Automation EZTouch HMIs |
| Resolution: | 800/640 x 480 pixels |
| Warranty: | 12 Months Warranty |
| Display Type: | TFT color LCD |
| Enclosure: | NEMA 4, 4X Class I Div II |
| Power Supply: | 24 V DC |
| Storage Temperature: | -25 to 65 °C (-13 to 149 °F) |
| Touch Size: | 7" and 8" |
Related EZAutomation EZTouch HMIs Series HMI Part No. :
| EZTouch HMIs | Description | Inventory status |
| EZ7DT-T7C-E | EZTouch HMIs Front Overlay Touch Membrane Replacement | In Stock |
| EZ7DT-T8C-E | EZAutomation EZTouch Series Touch Glass Front Overlay Repair | In Stock |
| EZ7DT-T8C-EH | EZAutomation EZTouch Series Touch Digitizer Glass Overlay Repair | Available Now |
| EZ7DT-T10C-E | EZTouch HMI Panel Glass Protective Film Repair Replacement | Available Now |
| EZ7DT-T10C-EH | EZAutomation EZTouch Series Touch Screen Monitor Front Overlay | In Stock |
| EZ7DT-T12C-E | EZAutomation EZTouch Series Front Overlay MMI Touch Screen Repair | In Stock |
| EZ7DT-T12C-EH | EZAutomation EZTouch Series HMI Touch Screen Protective Film | Available Now |
| EZ9-T10C-E | EZAutomation EZTouch Series Protective Film Touchscreen Repair | In Stock |
| EZ12-T6C-E | EZAutomation EZTouch Series HMI Protective Film Touch Screen Glass | Available Now |
| EZ12-T7C-E | EZAutomation EZTouch Series Front Overlay Touch Screen Panel Repair | In Stock |
| EZ12-T8C-E | EZ Automation EZTouch Series Touch Screen Protective Film Replacement | In Stock |
| EZ12-T10C-E | EZTouch HMIs Series Touch Panel Protective Film Repair Replacement | Available Now |
| EZAutomation EZTouch | Description | Inventory status |
EZAutomation EZTouch HMIs Series HMI Manuals PDF Download:
FAQ:
Question: How to mount the EZ7DT-T7C-E EZ7DT-T8C-E EZ7DT-T8C-EH Touch Screen Front Overlay HMI unit?
Answer: These steps are described below with pictures:
The EZ7 is stud mounted. All the necessary mounting hardware is provided with the unit. Both the processor and the HMI screen have studs with nuts provided. Below is a full installation guide with step-by-step instructions.
1. Use the provided screen with screw-hole indicators to drill holes in your control cabinet.
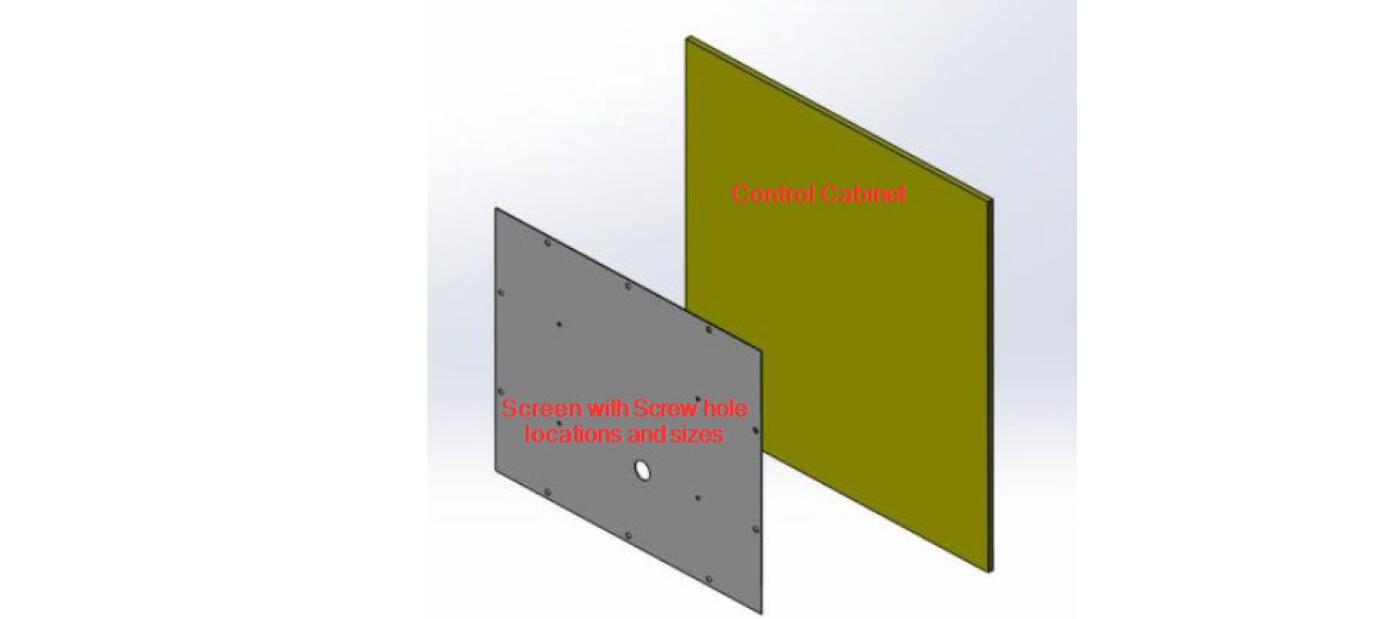
2. Once all the holes have been drilled in the cabinet. Take the Processor Box and plug in the provided HDMI cable into its connector port.
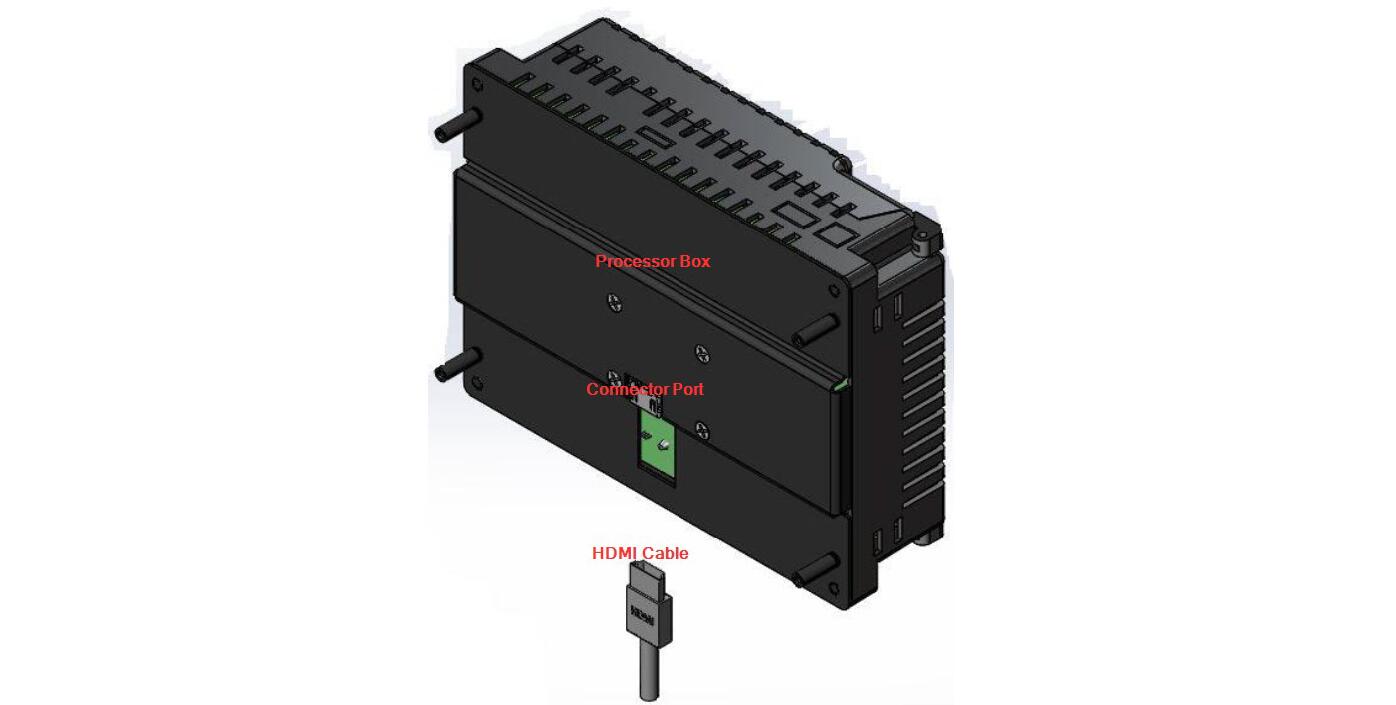
3. Then use the provided screws (6-32 Philips Flat head ½” length. (X 4), Screwdriver – Philips #2 ) to install the Processor Box to the inside of the Control Cabinet. Also, make sure that the HDMI cable is pulled through the large middle hole.
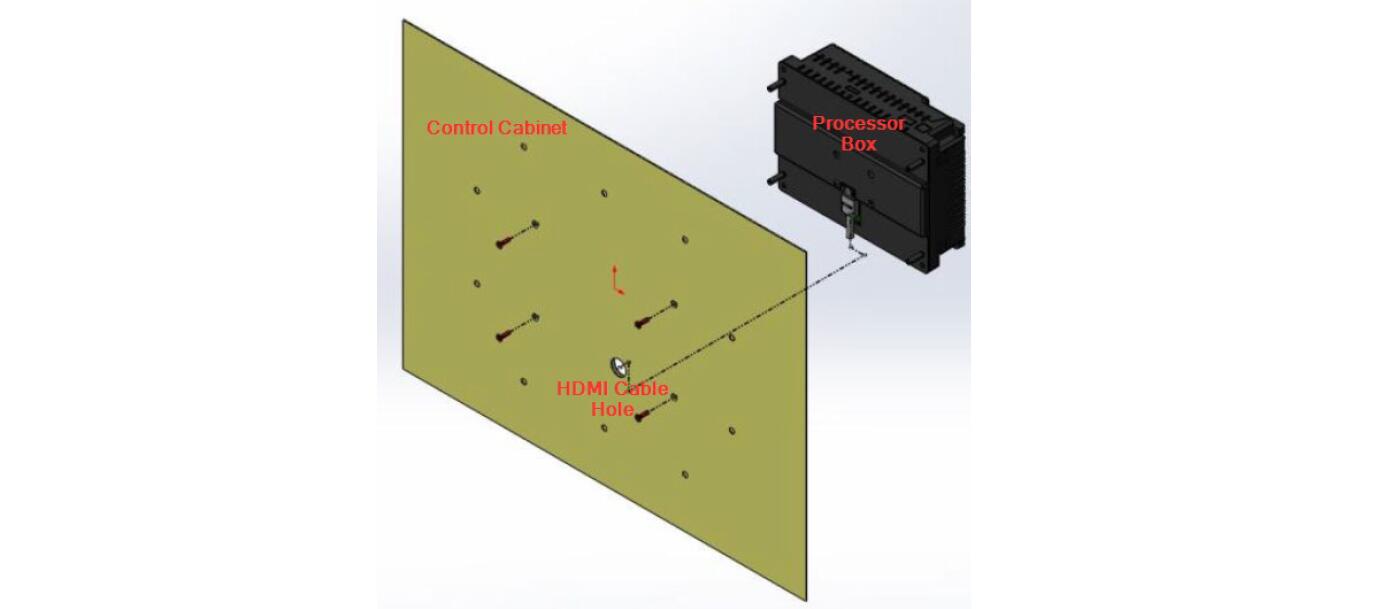
1) Now connect the HDMI cable to the HMI screen, make sure that the cable is pulled through the large middle hole.
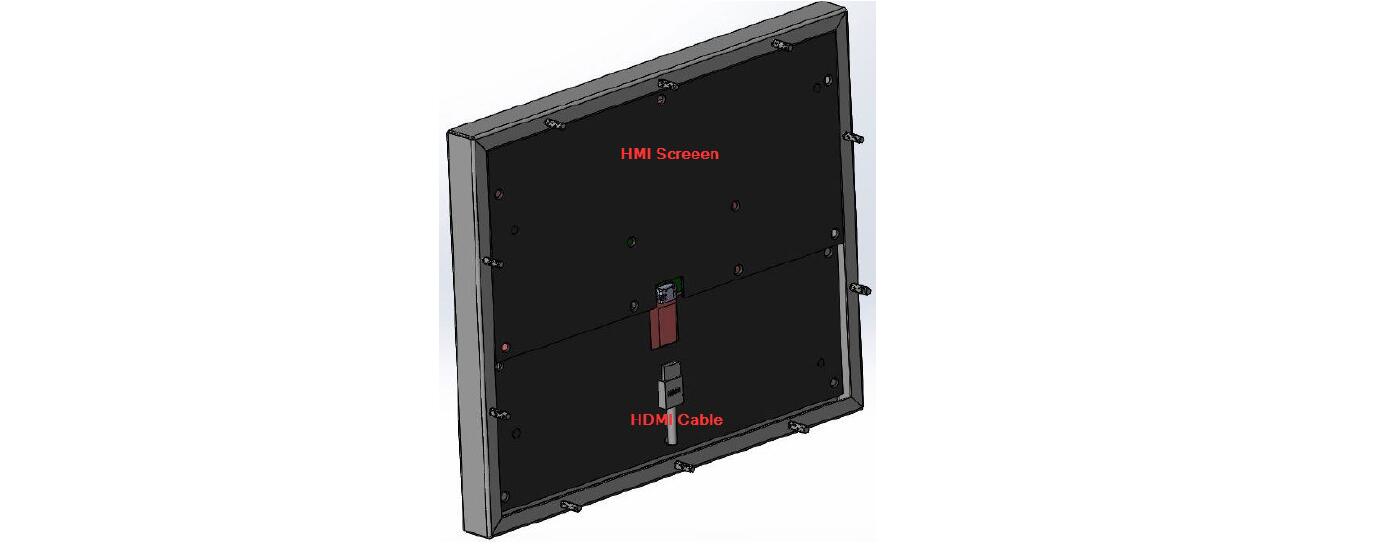
2) Now insert all studs through their respective holes, and use provided nuts (Hex-head nut, size 10-32 requiring 3/8” nut driver/wrench) to secure the front to the cabinet.
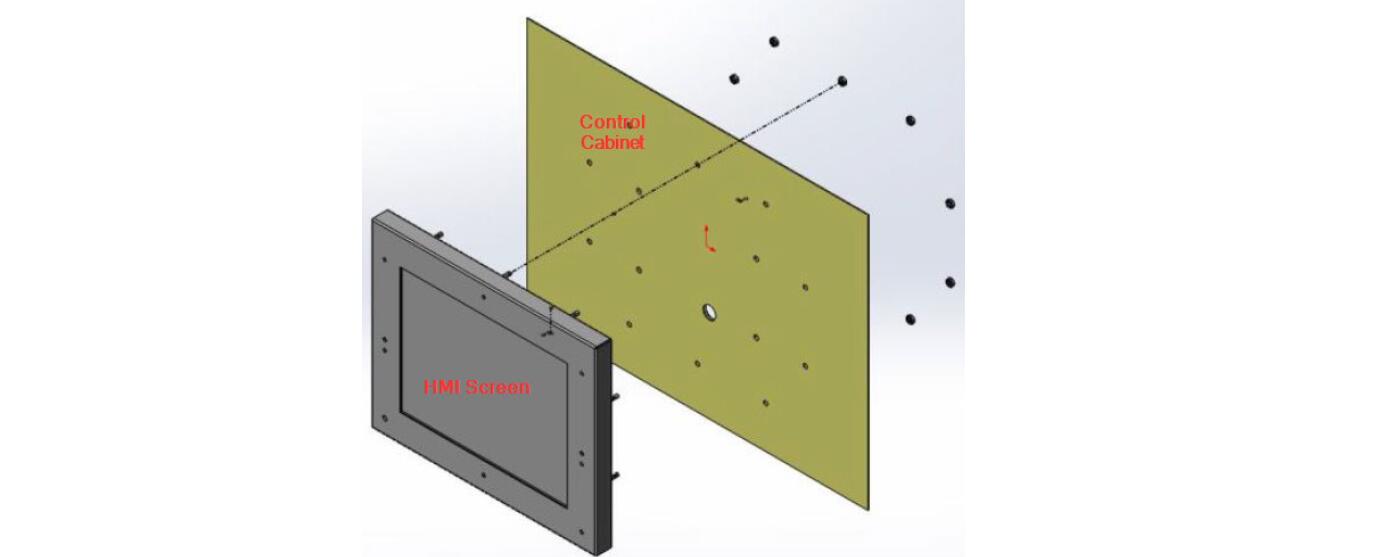
3) When looking from bottom or top the screen should look like the image below.

Question: What is EZ Automation EZTouch HMIs EZ7DT-T7C-E EZ7DT-T8C-E EZ7DT-T8C-EH Touch Screen and Protective Film HMI parts price?
Answer: Submit a fast quote, send VICPAS an email for best price.
Common misspellings:
EZ7DT-T7C-E EZ7DT-T8-E EZ7DT-T8C-EHEZ7DT-T7C-E EZ7DT-T8C-E EZ7T-T8C-EH
EZ7DT-TC7-E EZ7DT-T8C-E EZ7DT-T8C-EH
EZ7DT-T7C-E EZ7DT-T8C-E EZTDT-T8C-EH
EZ7DT-T7C-E EZ7DT-T88C-E EZ7DT-T8C-EH
